面向对象设计实践(基于java)
caiyi 2021/10/1
source:https://www.icourse163.org/spoc/course/ECNU-1464731161
期末划考试范围:junit单元测试,第三章文本处理,第四章文件处理,第五章多线程并行(5.4 5.7 5.8很少考 5.9定时任务要考),第六章网络编程(6.6 6.7 6.8不考),第七章数据库编程(7.3不考),第八章(8.1-8.4考的少 只考8.5 8.6)
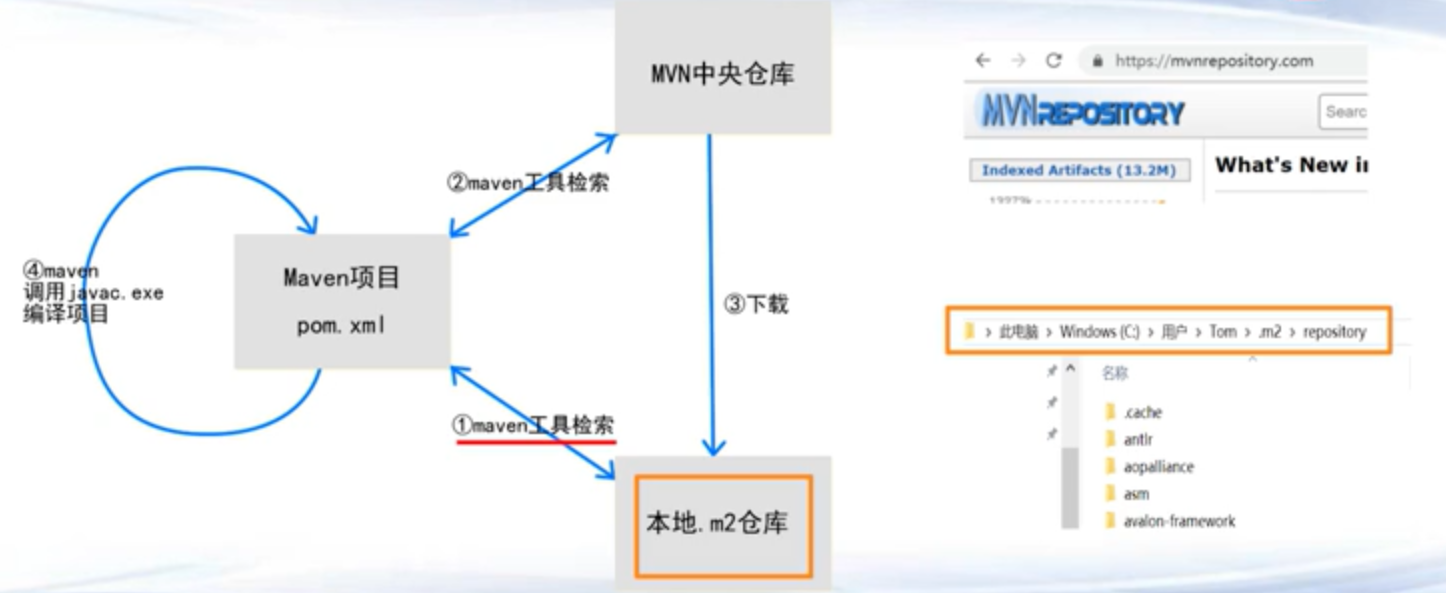
第一章 Maven
Maven概念
自动下载和管理jar包,配置build path,存在本地进行管理,编译、测试、运行、和打包发布java项目的构建工具
Maven编译工作流程
Maven目录结构

Maven项目构建流程
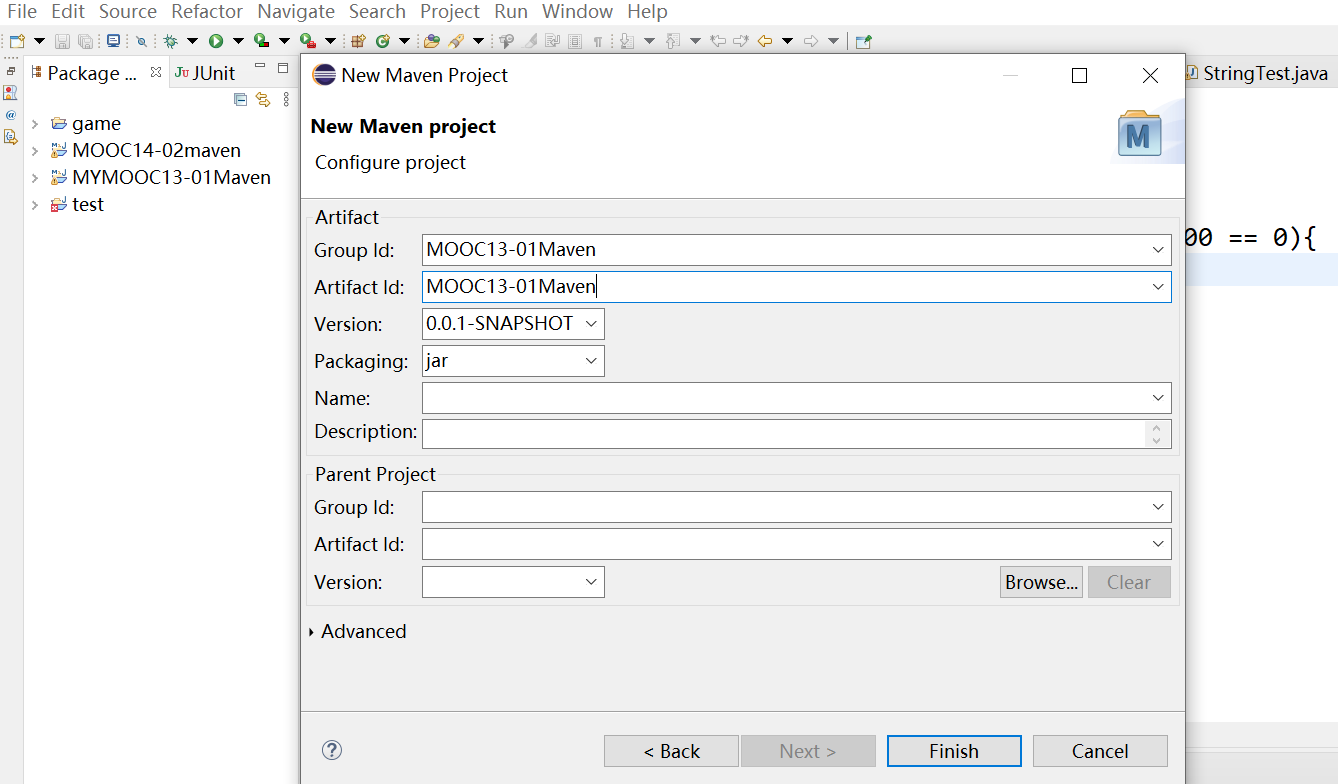
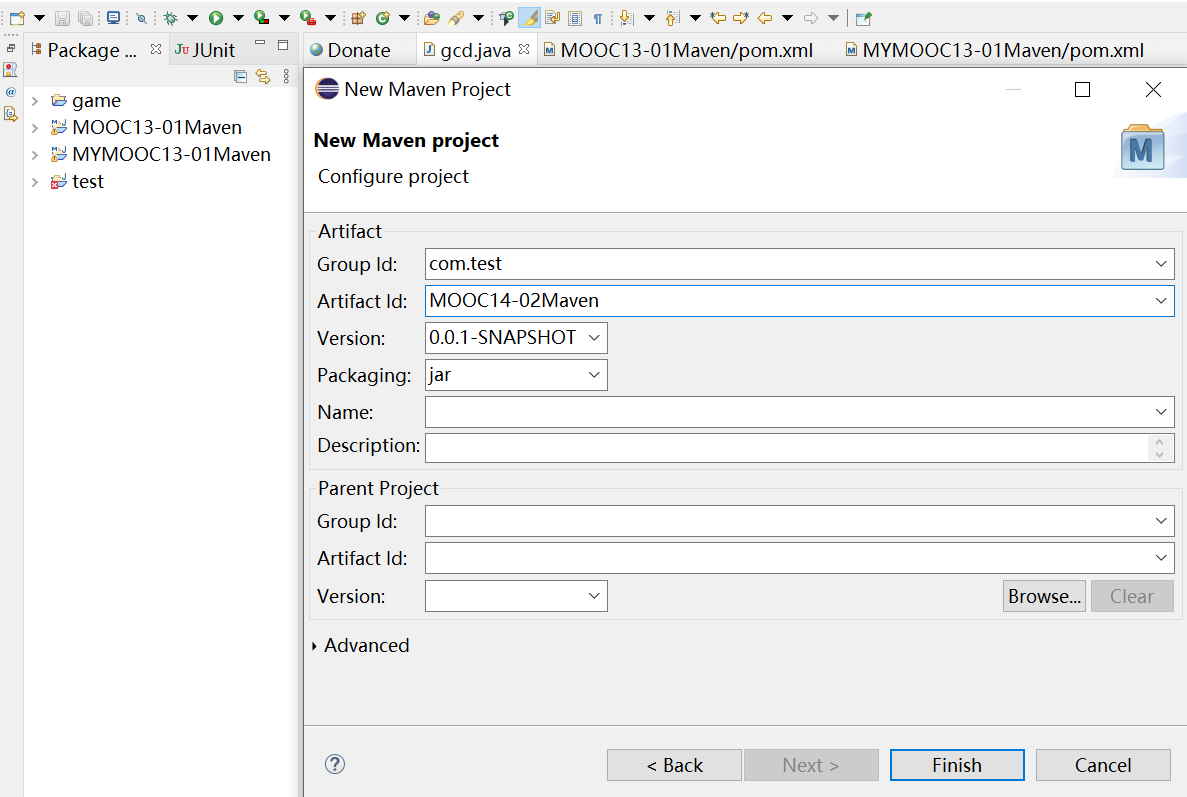
首先创建maven项目

选择 maven project

勾选 create a simple project

输入 group id (组织名)、artifact id(作品名/项目名)
然后在mvn中央仓库搜索工具包的名字
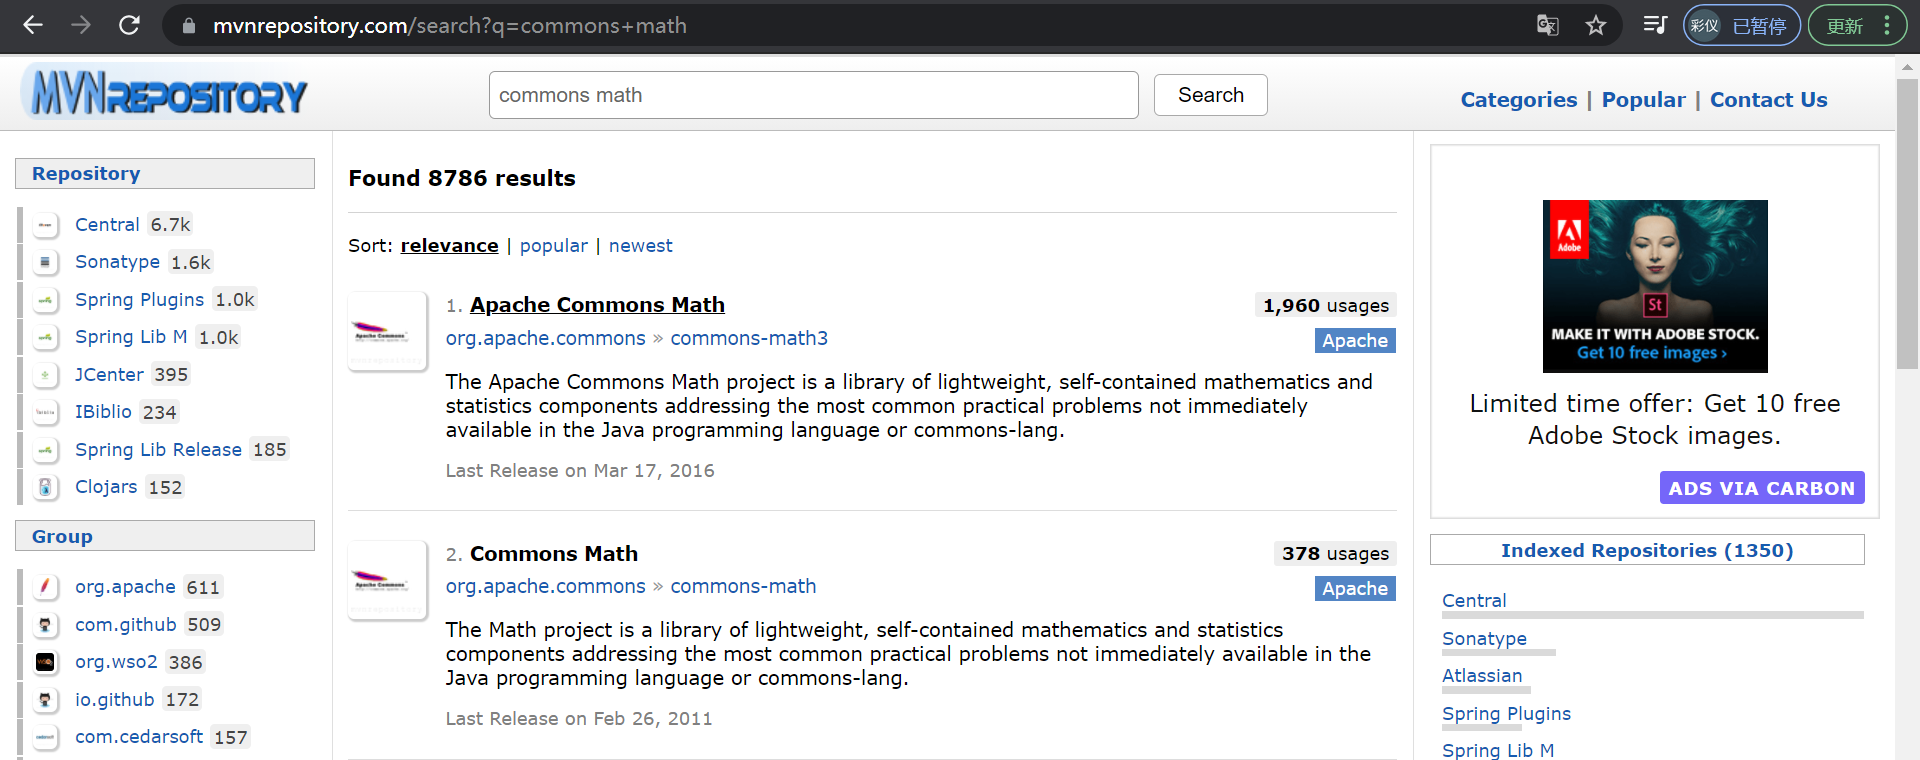
选择合适的版本,复制依赖文本

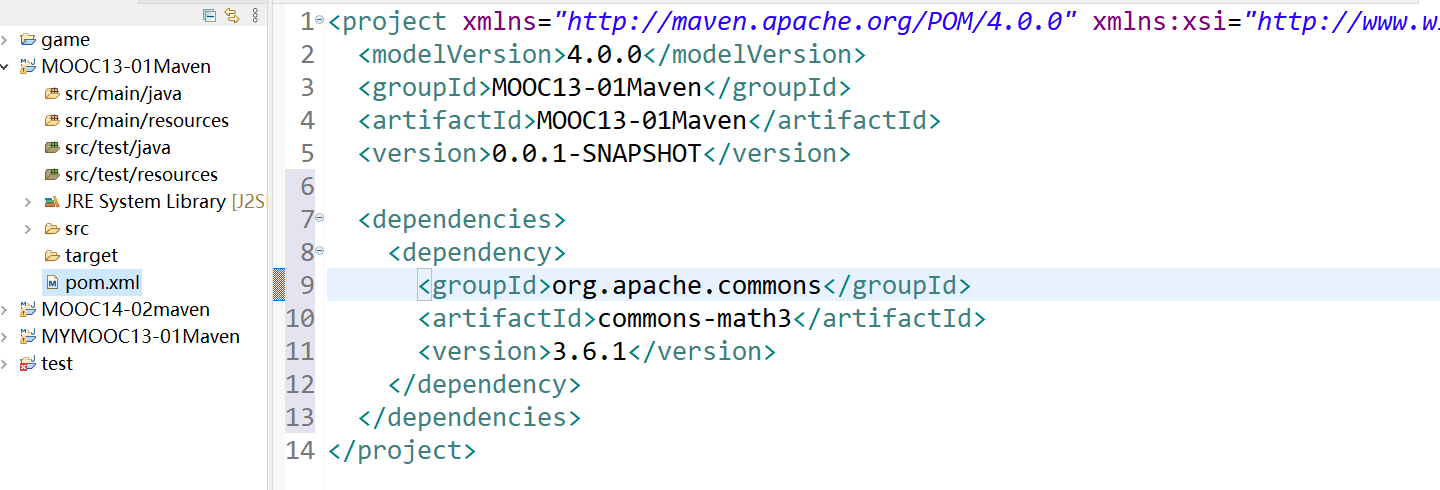
将依赖文本添加到项目pom.xml中
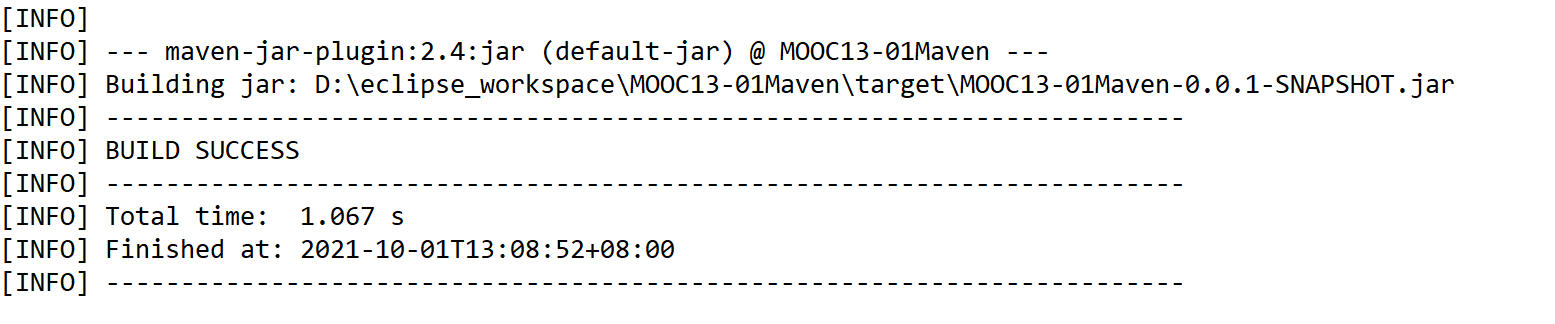
Maven编译和运行
右键项目 → Run As → Maven Build

在Goals输入 clean package → Apply → Run

编译成功
编译过程中他会自动把jar包下载下来
运行程序

总结,构建工具的功能
- 自动帮程序员甄别和下载第三方库(jar)
- 完成整个项目编译(调用javac.exe)
- 完成整个项目单元测试流程(调用JUnit工具)
- 完成项目打包(jar/war等格式,调用jar.exe)
一些常用的依赖文本
opencc4j 简体转繁体
<dependency>
    <groupId>com.github.houbb</groupId>
    <artifactId>opencc4j</artifactId>
    <version>1.7.1</version>
</dependency>
Junit 测试
<dependency>
    <groupId>junit</groupId>
    <artifactId>junit</artifactId>
    <version>4.13</version>
    <scope>test</scope>
</dependency>
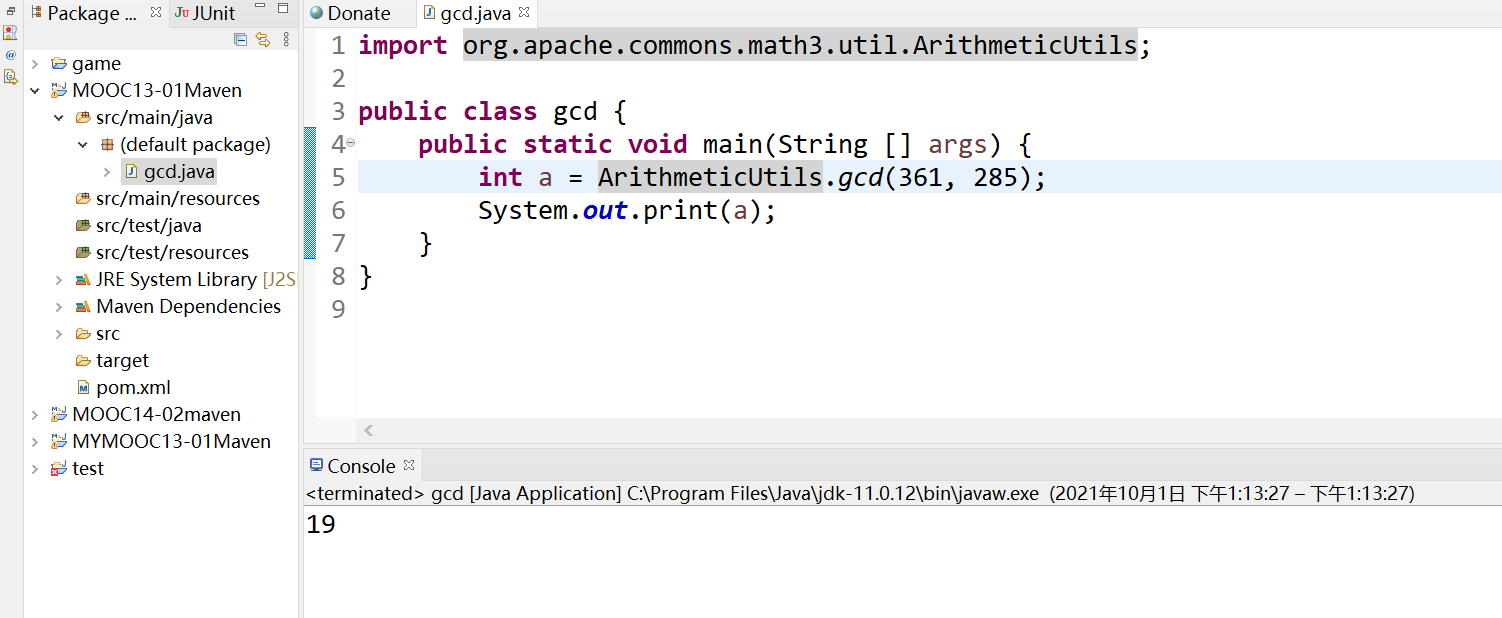
commons math 数学
<dependency>
    <groupId>org.apache.commons</groupId>
    <artifactId>commons-math3</artifactId>
    <version>3.6.1</version>
</dependency>
pinyin4j 汉字转拼音
<dependency>
    <groupId>com.belerweb</groupId>
    <artifactId>pinyin4j</artifactId>
    <version>2.5.1</version>
</dependency>
Maven报错解决办法

在pom.xml中添加以下配置语句
<properties>
    <project.build.sourceEncoding>UTF-8</project.build.sourceEncoding>
    <maven.compiler.encoding>UTF-8</maven.compiler.encoding>
    <java.version>1.8</java.version>
    <maven.compiler.source>1.8</maven.compiler.source>
    <maven.compiler.target>1.8</maven.compiler.target>
</properties>
第二章 单元测试和Junit
软件测试
在规定的条件下对程序进行操作, 以发现程序错误,衡量软件质量,并对其是否能满足设计要求进行评估的过程
软件测试分类
单元 vs 集成测试
白盒 vs 黑盒测试
自动 vs 手动测试
回归测试、压力测试
JUnit:一个java语言的单元测试框架,大部分java IDE都集成了JUnit作为单元测试工具
JUnit 用法
用上一章的方法新建一个maven项目
⭐️记得在 pom.xml 里导入 JUnit 的依赖文本,否则会报错
<dependencies>
    <dependency>
        <groupId>junit</groupId>
        <artifactId>junit</artifactId>
        <version>4.13</version>
    </dependency>
</dependencies>
观察项目目录,我们在src/main/java 里面放业务代码,src/test/java 里面放测试代码

在 src/main/java 新建 LeapYear.java,给定一个年份,判断是不是闰年
public class LeapYear {

    public boolean isLeapYear(int year) {
        if(year % 4 == 0 && year % 100 != 0 || year % 400 == 0){
            return true;
        }
        else{
            return false;
        }
    }
}
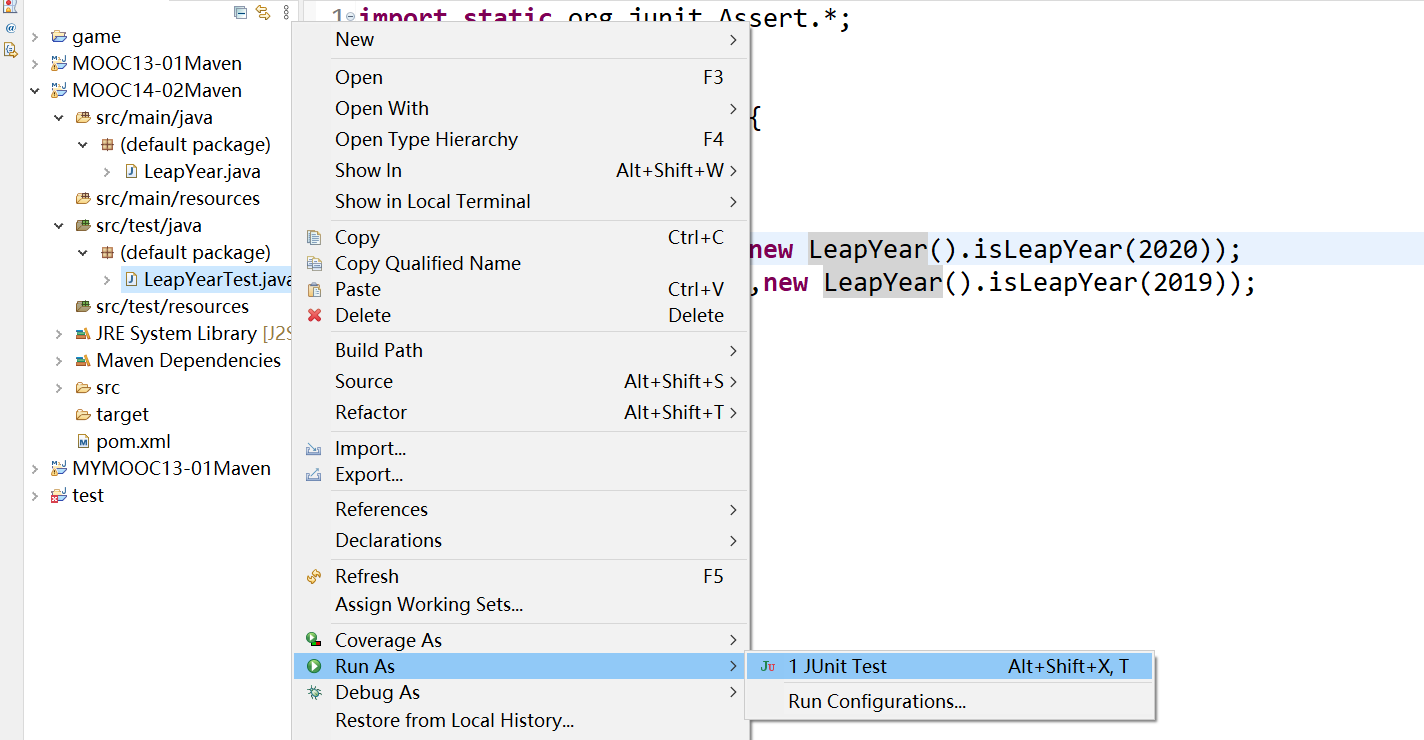
在 src/test/java 新建 LeapYearTest.java
每一个测试方法的头部加@Test注解,这样JUnit会自动执行这些测试方法
import是导入一个类或者几个类,import static是导入某一个类的所有静态方法,以便我们在程序调用的时候不需要再写 Assert.assertEquals()
import static org.junit.Assert.*;
import org.junit.Test;

public class LeapYearTest {

    @Test
    public void test() {
        assertEquals(true,new LeapYear().isLeapYear(2020));
        assertEquals(false,new LeapYear().isLeapYear(2019));
    }
}
junit单元测试,右键LeapYearTest.java → Run As → JUnit Test
结果正确!

修改一下代码,运行结果错误!和我们期待的值不一样
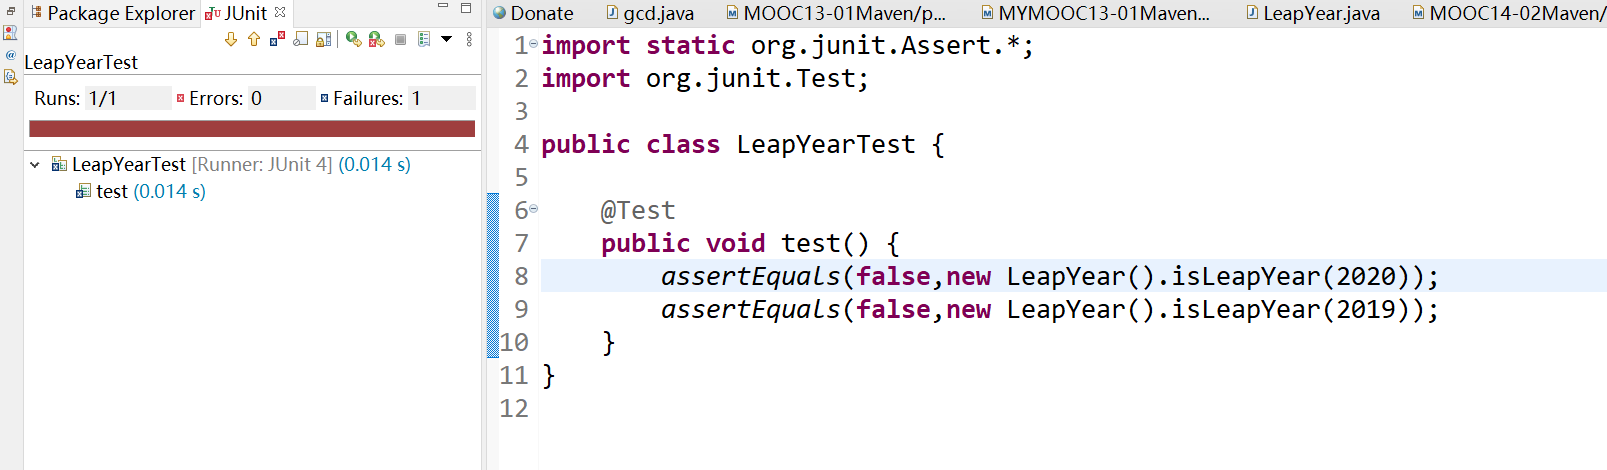
我们也可以通过Maven Test来运行JUnit程序

运行错误
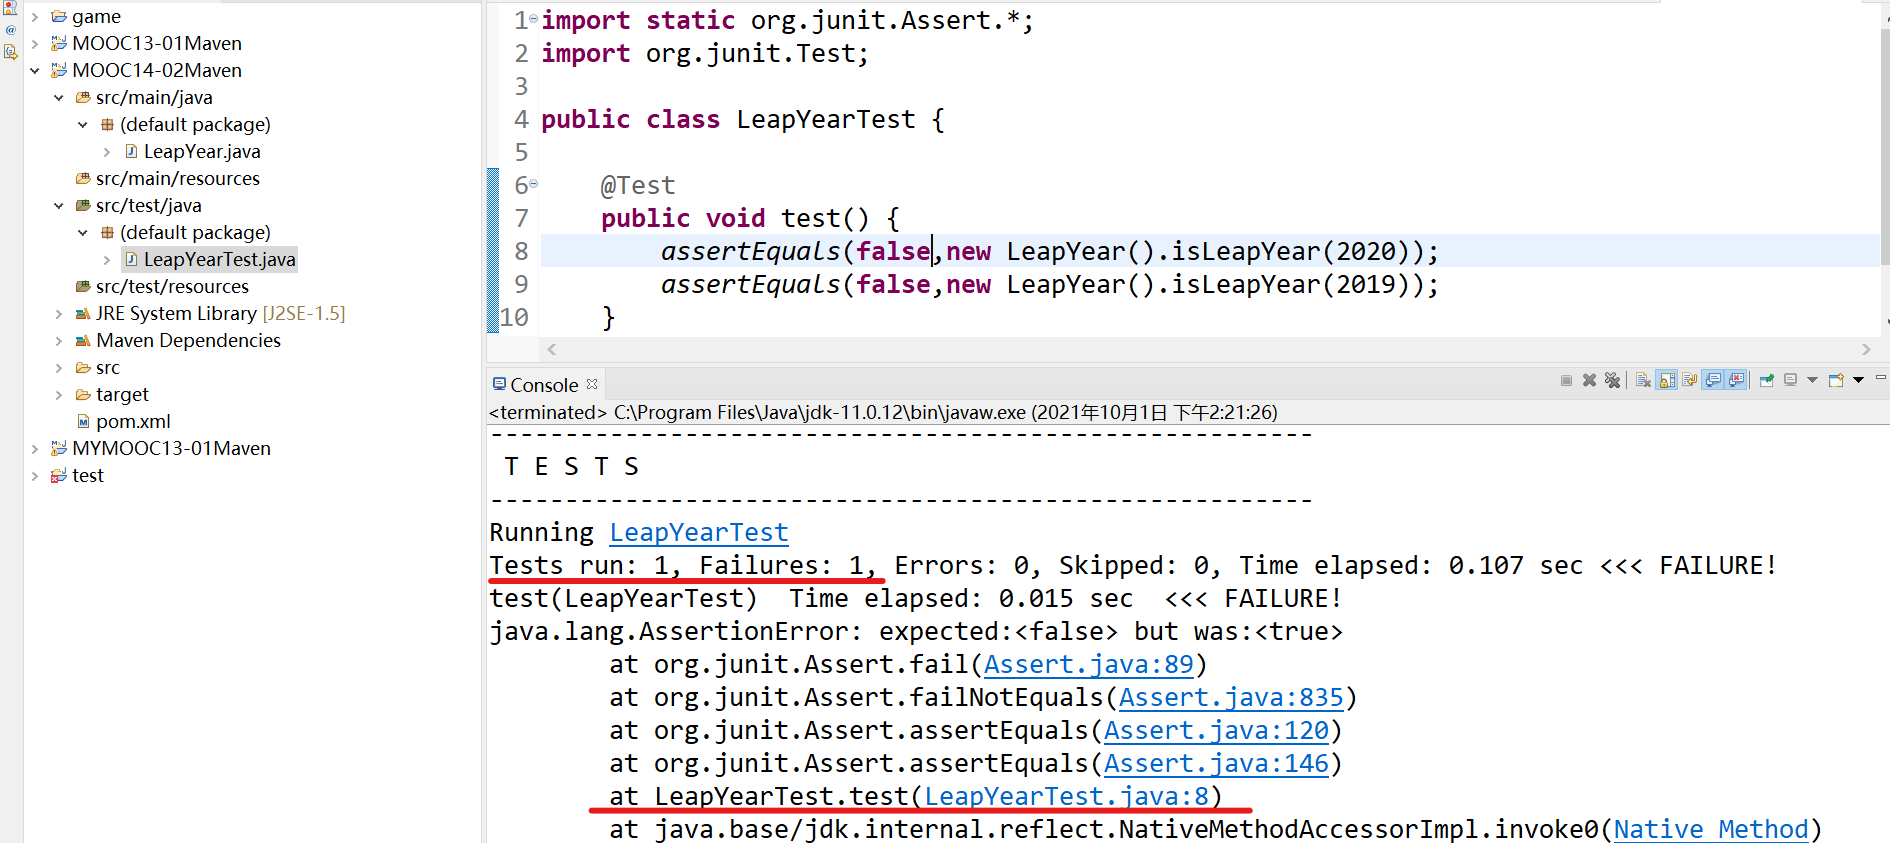
修改第八行的 false 为 true,运行正确

二者区别
JUnit一次只能执行一个test类,Maven可以批量执行
第三章 高级文本处理
3.1 Java字符编码
ASCII码
用一个字节(1 Byte = 8 bits)来存储 a-z A-Z 0-9和一些常用的符号,回车13,零48,A65,a97
Unicode编码
编码方案有UTF-8,兼容ASCII,变长1-4个字节存储字符,经济方便传输
Java的字符编码
源文件编码:采用UTF-8编码
程序内部采用UTF-16编码存储所有字符(不是程序员控制)
和外界(文本文件)的输入输出尽量采用UTF-8编码
通过几个程序了解一下Java字符编码
获取默认字符集,本机默认是GBK
输出所有支持的字符集

用UTF-8格式写入文件
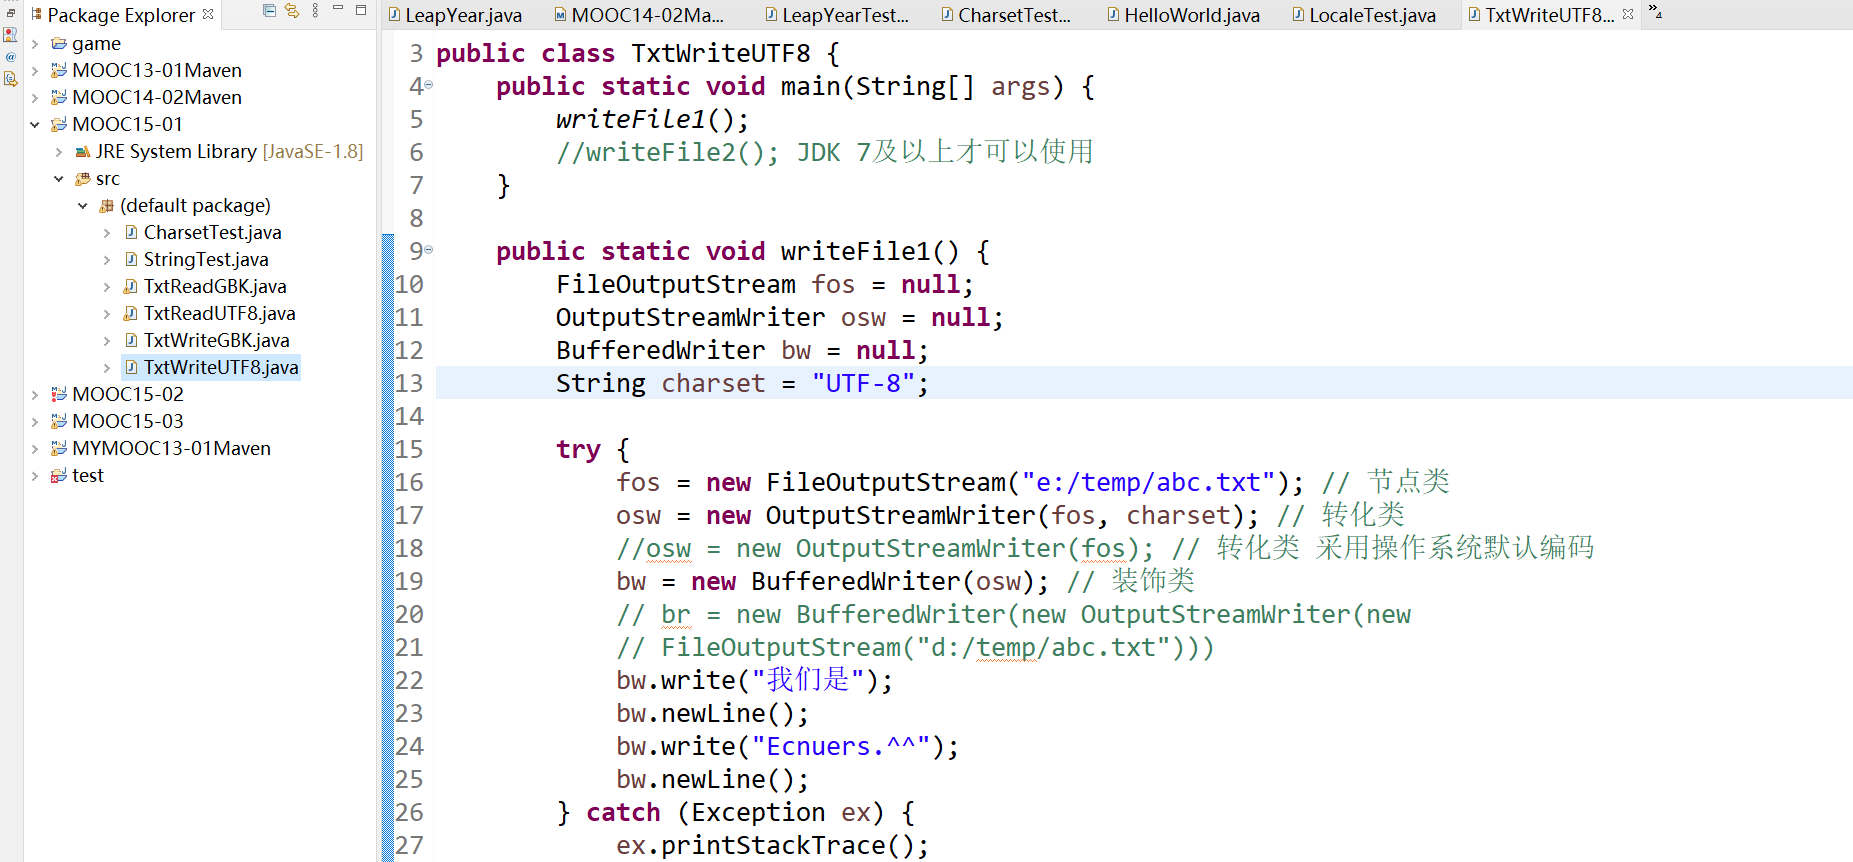
写入成功

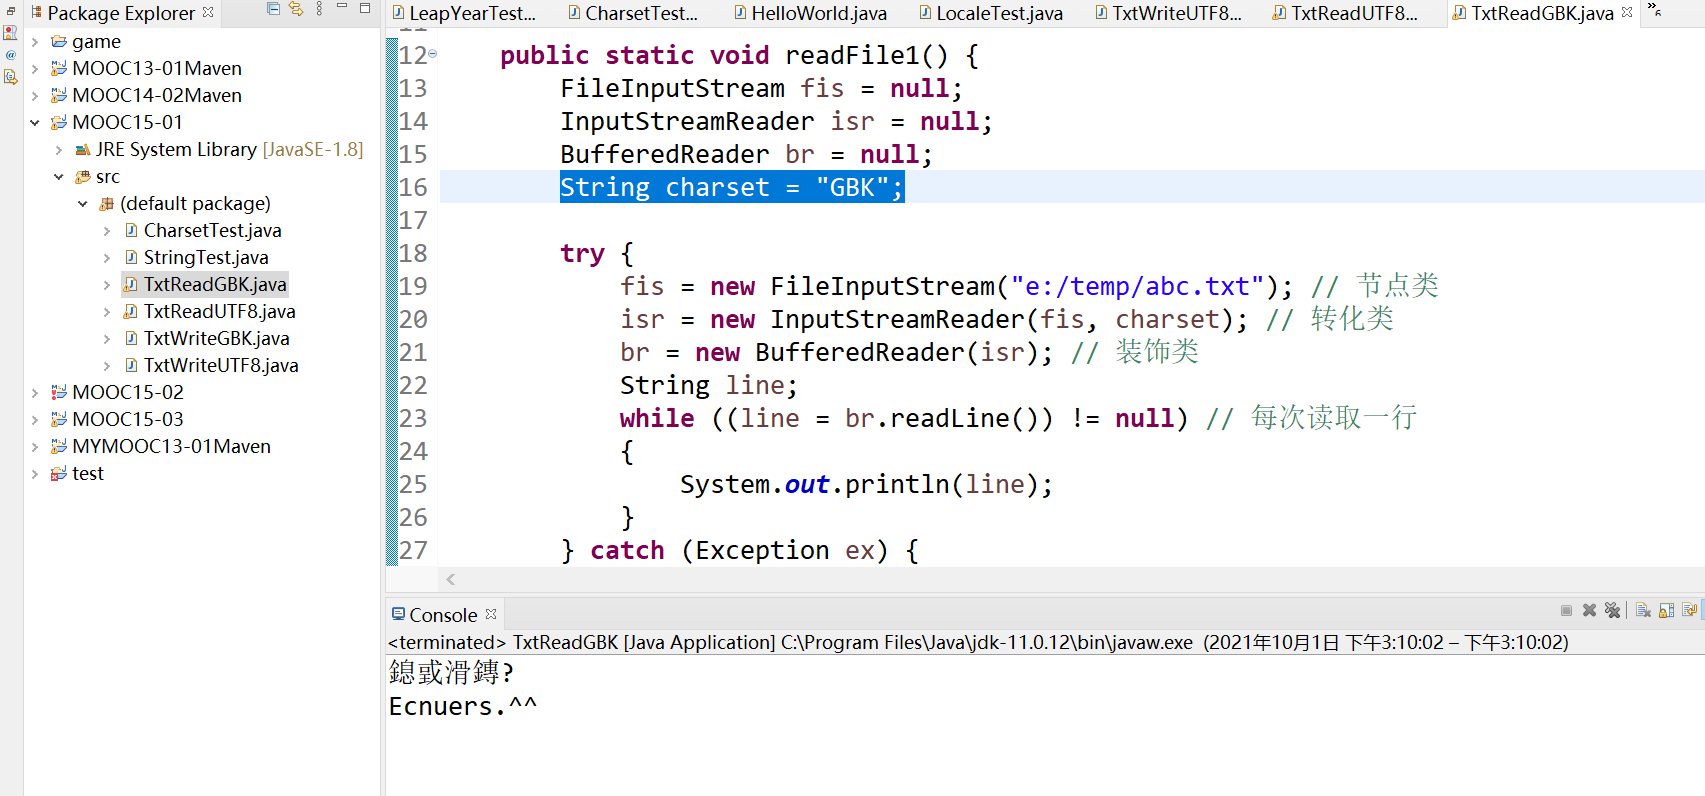
接着用UTF-8编码读取文件

读取成功!

再试试用 GBK 编码读取文件呢,可以发现它乱码了
3.2 Java国际化编程
多语言版本的软件,一套语言多个语言包,根据语言设定,可以切换显示文本
主要用到两个类
java.util.ResourceBundle 用于加载一个语言_国家语言包
java.util.Locale 定义一个语言_国家
Locale类
属性:语言(zh, en),国家地区(CN, US)
方法:getAvailableLocales(), getDefault()返回默认的
ResourceBundle类
→ 根据 Locale 的值加载对应的properties文件
→ 存储语言集合中所有的K-V对
→ getString(String key) 返回所对应的value
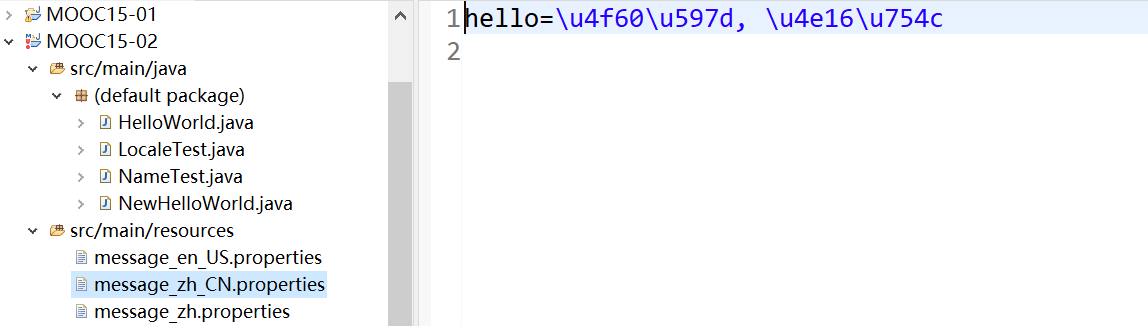
properties语言文件
我们所有的文本值都放在 properties文件里面,存放的都是KV对,存储文件必须是ASCII编码或Unicode编码
命名规则:包名 _ 语言 _ 国家地区.properties、
可以采用native2ascii.exe进行转码

国际化转化演示
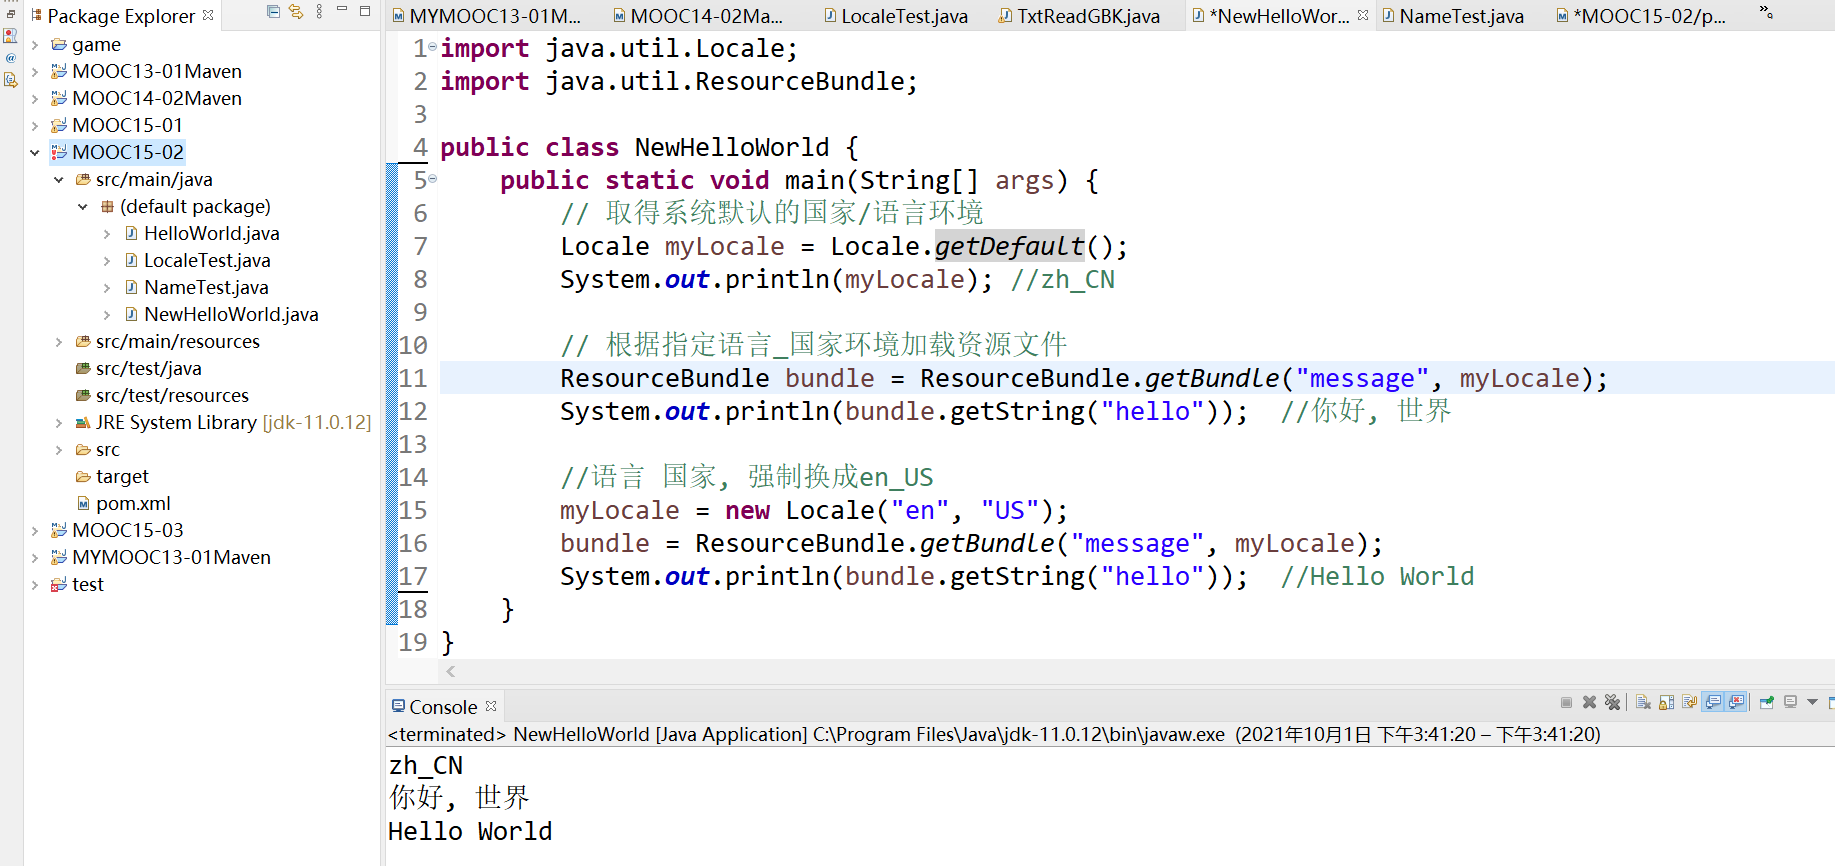
所有的文本值都放在 properties文件里面

其他国际化
日期时间国际化 DateTimeFormatter和Locale的结合
数字金额国际化 NumberFormat和Locale的结合
解决引入java.util 爆红的方法
右键项目 → Build Path → Configure Build Path
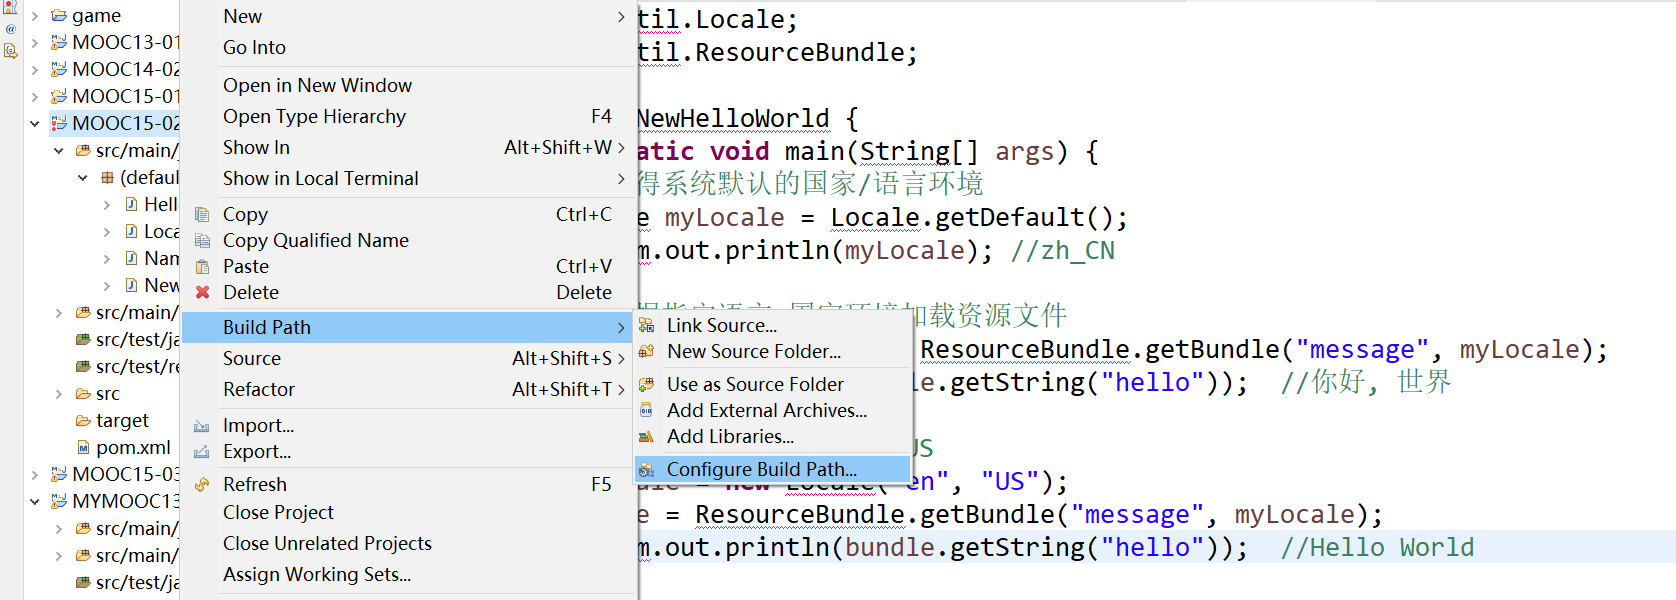
Java Build Path → Libraries选项卡 → 右侧Add Library按钮 → JRE System Library

3.3 高级字符串处理
3.3.1 正则表达式
用事先定义好的一些特定字符、及这些特定字符的组合,组成一 个“规则字符串”,用于测试字符串内的模式、识别和替换文本、提取文本
匹配模板:定界符、原子、特殊功能字符、模式修正符
Java.util.regex包
-
Pattern 正则表达式的编译表示
compile 编译一个正则表达式为Pattern对象
matcher 用Pattern对象匹配一个字符串,返回匹配结果
-
Matcher
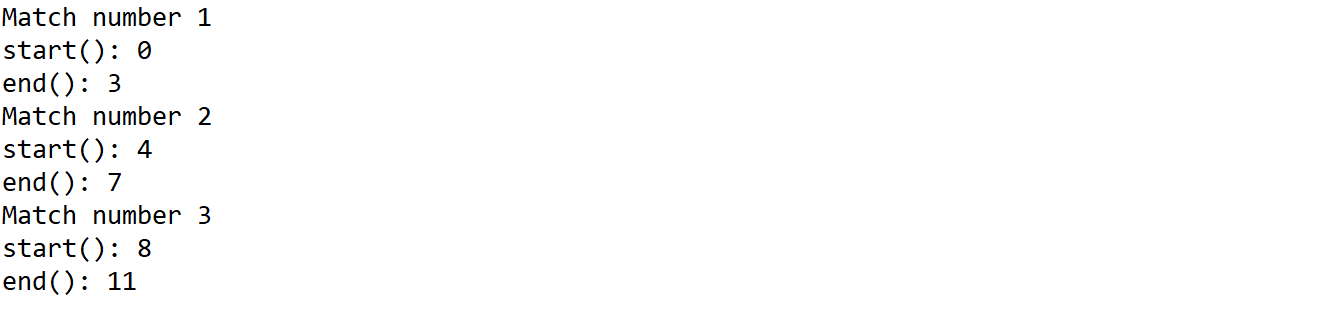
Index Methods(位置方法) // start(), start(int group), end(), end(int group)
Study Methods(查找方法) // lookingAt(), find(), find(int start), matches()
Replacement Methods(替换方法) //replaceAll(String replacement)
例子
example1:一个pattern就代表一个正则表达式

example2:lookingAt()和matches()的区别

example3:替换掉满足匹配模式的字符串为另一个替换字符文额 e

example4:把所有dog替换为cat,dogs替换为cats

example5:用replaceAll()的方法修改example3

example6:邮箱的正则表达式判断

public static  void regularExpression() {
    String REGEX_EMAIL = "^\\w+((-\\w+)|(\\.\\w+))*@[A-Za-z0-9]+(([.\\-])[A-Za-z0-9]+)*\\.[A-Za-z0-9]+$";//email
    Pattern pattern = Pattern.compile(REGEX_EMAIL);

    String[] emails = new String[]{"123^@qq.com", "name_321@163.com", "+whatever*72@gmail.com"};
    for(String email : emails) {
        Matcher matcher = pattern.matcher(email);
        if (matcher.matches()) {
            System.out.println(email + " is valid email.");
        } else {
            System.out.println(email + " is not valid email.");
        }
    }
}
3.3.2 其他字符串处理
集合和字符串互转
引入依赖文件
<dependency>
    <groupId>org.apache.commons</groupId>
    <artifactId>commons-lang3</artifactId>
    <version>3.12.0</version>
</dependency>
import依赖包
import org.apache.commons.lang3.StringUtils;

public class String2List {

    public static void main(String[] args) {
        List<String> names = new LinkedList<String>();
        names.add("Xiaohong");
        names.add("Xiaoming");
        names.add("Daming");
        names.add("Xiaohei");

        //从ArrayList变到字符串
        String str1 = String.join(",", names);  //String.join, JDK 8 引入
        System.out.println(str1);

        String str2 = StringUtils.join(names, ",");  //Apache Commons Lang
        System.out.println(str2);

        //从字符串变回ArrayList
        List<String> names2 = Arrays.asList(str2.split(","));
        for(String name:names2)
        {
            System.out.println(name);
        }

        //StringUtils 可以支持更多数据类型
        List<Integer> ids = new ArrayList<Integer>();
        ids.add(1);
        ids.add(3);
        ids.add(5);
        String str3 = StringUtils.join(ids, ",");
        System.out.println(str3);
    }

}
OUTPUT

Xiaohong,Xiaoming,Daming,Xiaohei
Xiaohong,Xiaoming,Daming,Xiaohei
Xiaohong
Xiaoming
Daming
Xiaohei
1,3,5
字符串转义
<dependency>
    <groupId>org.apache.commons</groupId>
    <artifactId>commons-text</artifactId>
    <version>1.6</version>
</dependency>
import org.apache.commons.text.StringEscapeUtils;
public class EscapeString {

    public static void main(String[] args) {
        String str = "He didn't say, \"Stop!\"";

        //转义
        String escapedStr = StringEscapeUtils.escapeJava(str);
        System.out.println("escape" + ":" + escapedStr);

        //从转义字符串转回来
        String str2 = StringEscapeUtils.unescapeJava(escapedStr);
        System.out.println("unescape" + ":" + str2);
    }
}
OUTPUT
escape:He didn't say, \"Stop!\"
unescape:He didn't say, "Stop!"
变量名字格式化(驼峰命名)
<dependency>
    <groupId>com.google.guava</groupId>
    <artifactId>guava</artifactId>
    <version>27.0.1-jre</version>
</dependency>
import com.google.common.base.CaseFormat;
import com.google.common.base.Splitter;
import com.google.common.collect.Lists;

public class GuavaUtil {
    public static void main(String[] args) throws Exception {
        List<Integer> list = new ArrayList<Integer>();
        list.add(123);
        list.add(456);
        System.out.println(list);

        //直接初始化List数组
        List<Integer> integers = Lists.newArrayList(123, 456);
        System.out.println(integers);

        //拆分字符串,忽略空字符串
        Iterable<String> split = Splitter.on(',')
                .trimResults()
                .omitEmptyStrings()
                .split("123,321,,   abc");

        for (String s : split) {
            System.out.println(s);
        }

        //对比常规方法拆分字符串,忽略空字符串
        String a = "123,321,,   abc";
        String[] as = a.split(",");

        for(int i=0;i<as.length;i++)
        {
            if(null == as[i] || as[i].length()<=0)
            {
                continue;
            }
            else
            {
                System.out.println(as[i].trim());
            }
        }

        //驼峰命名
        String s1 = "CONSTANT_NAME";
        String s2 = CaseFormat.UPPER_UNDERSCORE.to(CaseFormat.LOWER_CAMEL, s1);
        System.out.println(s2); //constantName;
    }
}
从字符串到输入流
<dependency>
    <groupId>commons-io</groupId>
    <artifactId>commons-io</artifactId>
    <version>2.6</version>
</dependency>
import org.apache.commons.io.Charsets;
import org.apache.commons.io.IOUtils;

public class String2InputStream {
    public static void main(String[] args) {

        //构造字符串列表
        List<String> names = new LinkedList<String>();
        names.add("Xiaohong");
        names.add("Xiaoming");
        names.add("Daming");
        names.add("Xiaohei");

        //合并为一个字符串,以逗号相连
        String nameStr = String.join(",",names);

        //将字符串作为默认的输入流
        InputStream in = IOUtils.toInputStream(nameStr, Charsets.toCharset("UTF-8"));
        //重置系统的输入流
        System.setIn(in);

        //模拟键盘输入  这也是OJ平台测试用例输入的原理
        //此处也可以换成一个文件输入流
        Scanner sc=new Scanner(System.in);
        sc.useDelimiter(",");
        while(sc.hasNext())
        {
            System.out.println(sc.next());
        }

    }
}
第四章 高级文件处理
4.1 XML DOM解析
可扩展标记语言:意义加数据
DOM/SAX/Stax是JDK自带的解析功能
xml解析方法
树结构:DOM 文档对象模型
流结构:SAX 流机制解析器(推)、Stax 流机制解析器(拉)
DOM方法
其处理方式是将 XML 整个作为类似树结构的方式读入内存中
解析大数据量的 XML 文件,会遇到内存泄露及程序崩溃的风险。
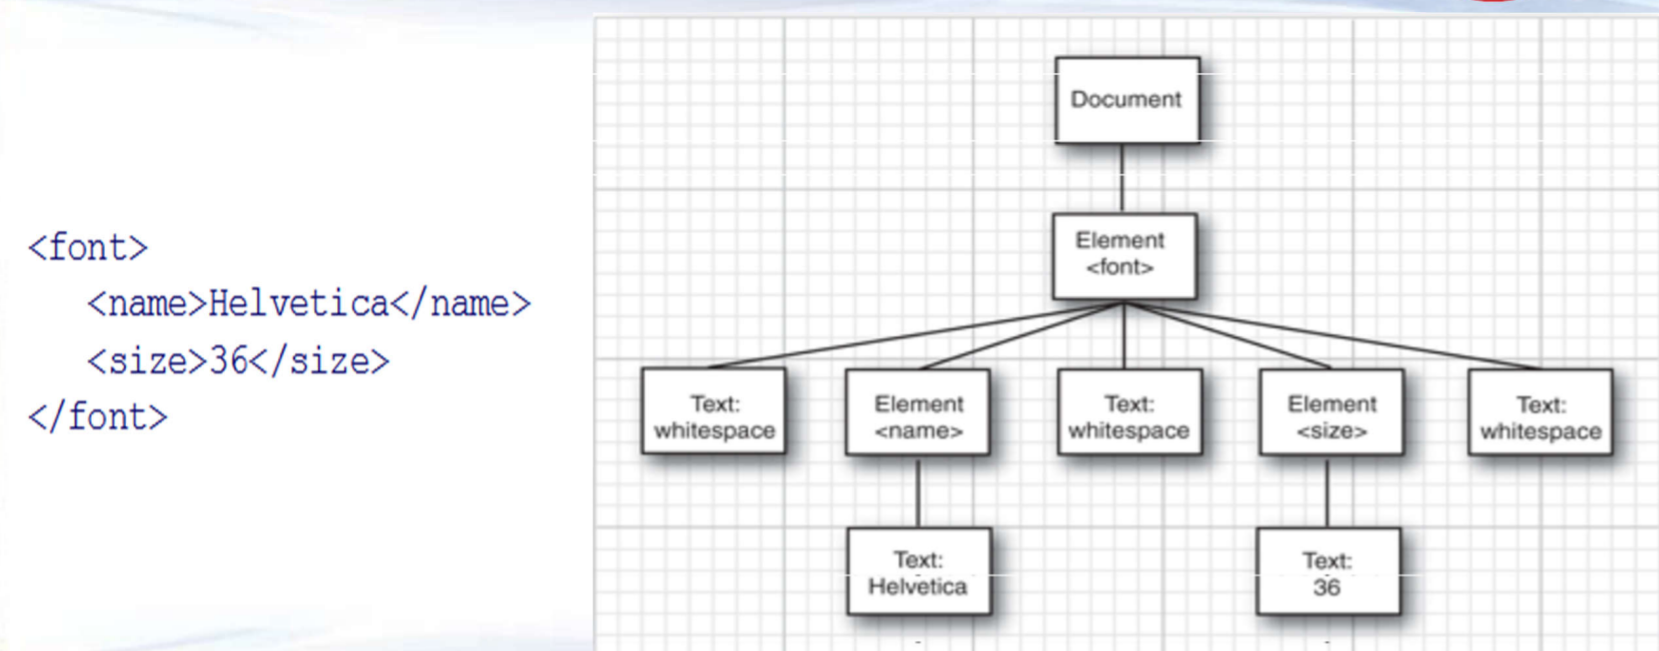
- DocumentBuilder 解析类,parse方法
- Node 节点主接口,getChildNodes返回一个NodeList
- NodeList 节点列表,每个元素是一个Node
- Document 文档根节点
- Element 标签节点元素 (每一个标签都是标签节点)
- Text节点 (包含在XML元素内的,都算Text节点)
- Attr节点(每个属性节点)
读取dom方法一,自上而下解析:
用到的函数
getNodeName()
getTextContent()

getChildNodes()
Node.ELEMENT_NODE
usersList.item(i)
public static void recursiveTraverse()
{
    try
    {
        //采用Dom解析xml文件
        DocumentBuilderFactory dbf = DocumentBuilderFactory.newInstance();
        DocumentBuilder db = dbf.newDocumentBuilder();
        Document document = db.parse("users.xml");

        //获取所有的一级子节点
        NodeList usersList = document.getChildNodes(); //长度为1

        //一级节点开始遍历
        for (int i = 0; i < usersList.getLength(); i++)
        {
            Node users = usersList.item(i);         //1  users
            NodeList userList = users.getChildNodes(); //获取二级子节点user的列表,长度为9

            //二级节点开始遍历
            for (int j = 0; j < userList.getLength(); j++) //9
            {
                Node user = userList.item(j);
                if (user.getNodeType() == Node.ELEMENT_NODE)
                {
                    NodeList metaList = user.getChildNodes();  //长度为7

                    //三级节点开始遍历
                    for (int k = 0; k < metaList.getLength(); k++) //7
                    {
                        //到最后一级文本
                        Node meta = metaList.item(k);
                        if (meta.getNodeType() == Node.ELEMENT_NODE)
                        {
                            System.out.println(metaList.item(k).getNodeName()
                                               + ":" + metaList.item(k).getTextContent());
                        }
                    }
                    System.out.println();
                }
            }
        }
    } catch (Exception e) {
        e.printStackTrace();
    }
}
读取dom方法二,搜索:
public static void traverseBySearch()
{
    try
    {
        //采用Dom解析xml文件
        DocumentBuilderFactory dbf = DocumentBuilderFactory.newInstance();
        DocumentBuilder db = dbf.newDocumentBuilder();
        Document document = db.parse("users.xml");

        Element rootElement = document.getDocumentElement();

        NodeList nodeList = rootElement.getElementsByTagName("name");
        if(nodeList != null)
        {
            for (int i = 0 ; i < nodeList.getLength(); i++)
            {
                Element element = (Element)nodeList.item(i);
                System.out.println(element.getNodeName() + " = " + element.getTextContent());
            }
        }
    } catch (Exception e) {
        e.printStackTrace();
    }
}
基于dom技术写xml文件:
public class DomWriter {

    public static void main(String[] args) {

        try {
            DocumentBuilderFactory dbFactory = DocumentBuilderFactory.newInstance();
            DocumentBuilder dbBuilder = dbFactory.newDocumentBuilder();

            //新创建一个Document节点
            Document document = dbBuilder.newDocument();
            if (document != null)
            {
                Element docx = document.createElement("document");  //都是采用Document创建元素
                Element element = document.createElement("element");
                element.setAttribute("type", "paragraph");
                element.setAttribute("alignment", "left"); //element增加2个属性

                Element object = document.createElement("object");
                object.setAttribute("type", "text");

                Element text = document.createElement("text");
                text.appendChild(document.createTextNode("abcdefg")); //给text节点赋值
                Element bold = document.createElement("bold");
                bold.appendChild(document.createTextNode("true"));    //给bold节点赋值

                object.appendChild(text);      //把text节点挂在object下
                object.appendChild(bold);      //把bold节点挂在object下
                element.appendChild(object);   //把object节点挂在element下
                docx.appendChild(element);     //把element节点挂在docx下
                document.appendChild(docx);    //把docx挂在document下

                TransformerFactory transformerFactory = TransformerFactory.newInstance();
                Transformer transformer = transformerFactory.newTransformer();
                DOMSource source = new DOMSource(document);

                //定义目标文件
                File file = new File("dom_result.xml");
                StreamResult result = new StreamResult(file);

                //将xml内容写入到文件中
                transformer.transform(source, result);

                System.out.println("write xml file successfully");
            }
        } catch (Exception e) {
            e.printStackTrace();
        }
    }
}
运行结果:
<document>
    <element alignment="left" type="paragraph">
        <object type="text">
            <text>abcdefg</text>
            <bold>true</bold>
        </object>
    </element>
</document>
4.2 SAX DOM解析
Simple API for XML
采用事件/流模型来解析 XML 文档,更快速、更轻量。
有选择的解析和访问,不像 DOM 加载整个文档,内存要求较低。
SAX 对 XML 文档的解析为一次性读取,不创建/不存储文档对象,很难同时访问文档中的多处数据。
推模型:当它每发现一个节点就引发一个事件,而我们需要编写这些事件的处理程序,defaulthandler
public class SAXReader {
    public static void main(String[] args) throws SAXException, IOException {
        XMLReader parser = XMLReaderFactory.createXMLReader();
        BookHandler bookHandler = new BookHandler();
        parser.setContentHandler(bookHandler);
        parser.parse("books.xml");
        System.out.println(bookHandler.getNameList());
    }
}

//定义响应程序,必须继承DefaultHandler
class BookHandler extends DefaultHandler {
    private List<String> nameList;
    private boolean title = false;

    public List<String> getNameList() {
        return nameList;
    }

    // xml文档加载时
    public void startDocument() throws SAXException {
        System.out.println("Start parsing document...");
        nameList = new ArrayList<String>();
    }

    // 文档解析结束
    public void endDocument() throws SAXException {
        System.out.println("End");
    }

    // 访问某一个元素,qname指每个尖括号里面的名字
    public void startElement(String uri, String localName, String qName, Attributes atts) throws SAXException {

        if (qName.equals("title")) {  //要解析其他元素只需要改这里,比如把“title”改为“year”
            title = true;
        }
    }

    // 结束访问元素
    public void endElement(String namespaceURI, String localName, String qName) throws SAXException {
        // End of processing current element
        if (title) {
            title = false;
        }
    }

    // 访问元素正文
    public void characters(char[] ch, int start, int length) {

        if (title) {
            String bookTitle = new String(ch, start, length);
            System.out.println("Book title: " + bookTitle);
            nameList.add(bookTitle);
        }
    }

}
4.3 Stax DOM解析
Streaming API for XML
流模型中的拉模型
在遍历文档时,会把感兴趣的部分从读取器中拉出,不需要引发事件,允许我们选择性地处理节点
两套处理API:
基于指针的API, XMLStreamReader
基于迭代器的API,XMLEventReader
方法一,流模式
public static void readByStream() {
    String xmlFile = "books.xml";
    XMLInputFactory factory = XMLInputFactory.newFactory();
    XMLStreamReader streamReader = null;
    try {
        streamReader = factory.createXMLStreamReader(new FileReader(xmlFile));
    } catch (FileNotFoundException e) {
        e.printStackTrace();
    } catch (XMLStreamException e) {
        e.printStackTrace();
    }

    // 基于指针遍历
    try {
        while (streamReader.hasNext()) {
            int event = streamReader.next();
            // 如果是元素的开始
            if (event == XMLStreamConstants.START_ELEMENT) {
                // 列出所有书籍名称
                if ("title".equalsIgnoreCase(streamReader.getLocalName())) {
                    System.out.println("title:" + streamReader.getElementText());
                }
                if ("year".equalsIgnoreCase(streamReader.getLocalName())) {
                    System.out.println("year:" + streamReader.getElementText());
                }
            }
        }
        streamReader.close();
    } catch (XMLStreamException e) {
        e.printStackTrace();
    }
}
方法二,事件模式
有点没看懂
public static void readByEvent() {
    String xmlFile = "books.xml";
    XMLInputFactory factory = XMLInputFactory.newInstance();
    boolean titleFlag = false;
    try {
        // 创建基于迭代器的事件读取器对象
        XMLEventReader eventReader = factory.createXMLEventReader(new FileReader(xmlFile));
        // 遍历Event迭代器
        while (eventReader.hasNext()) {
            XMLEvent event = eventReader.nextEvent();
            // 如果事件对象是元素的开始
            if (event.isStartElement()) {
                // 转换成开始元素事件对象
                StartElement start = event.asStartElement();
                // 打印元素标签的本地名称

                String name = start.getName().getLocalPart();
                //System.out.print(start.getName().getLocalPart());
                if(name.equals("title"))
                {
                    titleFlag = true;
                    System.out.print("title:");
                }

                // 取得所有属性
                Iterator attrs = start.getAttributes();
                while (attrs.hasNext()) {
                    // 打印所有属性信息
                    Attribute attr = (Attribute) attrs.next();
                    //System.out.print(":" + attr.getName().getLocalPart() + "=" + attr.getValue());
                }
                //System.out.println();
            }

            //如果是正文
            if(event.isCharacters())
            {
                String s = event.asCharacters().getData();
                if(null != s && s.trim().length()>0 && titleFlag)
                {
                    System.out.println(s.trim());
                }
            }
            //如果事件对象是元素的结束
            if(event.isEndElement())
            {
                EndElement end = event.asEndElement();
                String name = end.getName().getLocalPart();
                if(name.equals("title"))
                {
                    titleFlag = false;
                }
            }
        }
        eventReader.close();
    } catch (FileNotFoundException e) {
        e.printStackTrace();
    } catch (XMLStreamException e) {
        e.printStackTrace();
    }
}
4.4 JSON解析
是一种轻量级的数据交换格式,类似XML,更小、更快、更易解析
最早用于Javascript中,容易解析,最后推广到全语言
尽管使用Javascript语法,但是独立于编程语言
三个JSON处理的包:
- org.json:JSON官方推荐的解析类
- GSON:Google出品
- Jackson:号称最快的JSON处理器
Java Bean对象:
- 具有一个无参的构造函数
- 可以包括多个属性,所有属性都是private
- 每个属性都有相应的Getter/Setter方法
OrgJson
- 从JSON里put和get数据
public static void testJsonObject() {
    //构造对象
    Person p = new Person();
    p.setName("Tom");
    p.setAge(20);
    p.setScores(Arrays.asList(60,70,80));

    //构造JSONObject对象
    JSONObject obj = new JSONObject();

    //string
    obj.put("name", p.getName());
    //int
    obj.put("age", p.getAge());
    //array
    obj.put("scores", p.getScores());
    //null
    //object.put("null", null);
    System.out.println(obj);

    System.out.println("name: " + obj.getString("name"));
    System.out.println("age: " + obj.getInt("age"));
    System.out.println("scores: " + obj.getJSONArray("scores"));
}
- 从json文件里面读取数据并放到person对象里面
public static void testJsonFile() {
    File file = new File("books.json");
    try (FileReader reader = new FileReader(file)) {
        //读取文件内容到JsonObject对象中
        int fileLen = (int) file.length();
        char[] chars = new char[fileLen];
        reader.read(chars);
        String s = String.valueOf(chars);
        JSONObject jsonObject = new JSONObject(s);

        //开始解析JSONObject对象
        JSONArray books = jsonObject.getJSONArray("books");
        List<Book> bookList = new ArrayList<>();
        for (Object book : books) {
            //获取单个JSONObject对象
            JSONObject bookObject = (JSONObject) book;
            Book book1 = new Book();
            book1.setAuthor(bookObject.getString("author"));
            book1.setYear(bookObject.getString("year"));
            book1.setTitle(bookObject.getString("title"));
            book1.setPrice(bookObject.getInt("price"));
            book1.setCategory(bookObject.getString("category"));
            bookList.add(book1);
        }

        for(Book book:bookList)
        {
            System.out.println(book.getAuthor() + ",  " + book.getTitle());
        }

    } catch (Exception e) {
        e.printStackTrace();
    }
}
//books.json
{
  "books": [
    {
      "category": "COOKING",
      "title": "Everyday Italian",
      "author": "Giada De Laurentiis",
      "year": "2005",
      "price": 30.00
    },
    {
      "category": "CHILDREN",
      "title": "Harry Potter",
      "author": "J K. Rowling",
      "year": "2005",
      "price": 29.99
    },
    {
      "category": "WEB",
      "title": "Learning XML",
      "author": "Erik T. Ray",
      "year": "2003",
      "price": 39.95
    }
  ]
}
GSON
- 可以通过gson函数很方便的在java对象和json里面直接转换,不需要像org.json一样还要put来get去
public static void testJsonObject() {
    //构造对象
    Person p = new Person();
    p.setName("Tom");
    p.setAge(20);
    p.setScores(Arrays.asList(60,70,80));

    //从Java对象到JSON字符串
    Gson gson = new Gson();
    String s = gson.toJson(p);
    System.out.println(s); //{"name":"Tom","age":20,"scores":[60,70,80]}

    //从JSON字符串到Java对象
    Person p2 = gson.fromJson(s, Person.class);
    System.out.println(p2.getName());  //Tom
    System.out.println(p2.getAge());   //20
    System.out.println(p2.getScores());//[60, 70, 80]

    //调用GSON的JsonObject
    JsonObject json = gson.toJsonTree(p).getAsJsonObject(); //将整个json解析为一颗树
    System.out.println(json.get("name"));  //"Tom"
    System.out.println(json.get("age"));   //20
    System.out.println(json.get("scores"));//[60,70,80]
}
- 从json文件中加载数据,变成一个对象数组,操作非常简单
public static void testJsonFile() {
    Gson gson = new Gson();
    File file = new File("books2.json");

    try (FileReader reader = new FileReader(file)) {
        List<Book> books = gson.fromJson(reader, new TypeToken<List<Book>>(){}.getType());

        for(Book book : books)
        {
            System.out.println(book.getAuthor() + ",  " + book.getTitle());
        }
    } catch (Exception e) {
        e.printStackTrace();
    }
}
Jackson
- java对象转换为json字符串
static void testJsonObject() throws IOException {
    ObjectMapper om = new ObjectMapper();

    //构造对象
    Person p = new Person();
    p.setName("Tom");
    p.setAge(20);
    p.setScores(Arrays.asList(60,70,80));

    //将对象解析为json字符串
    String jsonStr = om.writeValueAsString(p);
    System.out.println(jsonStr);

    //从json字符串重构对象
    Person p2 = om.readValue(jsonStr, Person.class);
    System.out.println(p2.getName());
    System.out.println(p2.getAge());
    System.out.println(p2.getScores());

    //从json字符串重构为JsonNode对象
    JsonNode node = om.readTree(jsonStr);
    System.out.println(node.get("name").asText());
    System.out.println(node.get("age").asText());
    System.out.println(node.get("scores"));
}
- 从json文件里加载数据变成对象数组,非常简单
static void testJsonFile() throws IOException {
    ObjectMapper om = new ObjectMapper();

    //从json文件中加载,并重构为java对象
    File json2 = new File("books2.json");
    List<Book> books = om.readValue(json2, new TypeReference<List<Book>>(){});
    for (Book book : books) {
        System.out.println(book.getAuthor());
        System.out.println(book.getTitle());
    }
}
4.5 图形图像解析
图形:Graph 矢量图,根据几何特性来画的,比如点、直线、弧线等
图像:Image 由像素点组成
图像格式:jpg, png, bmp, svg, wmf, gif, tiff 等
图像颜色:RGB(Red, Green, Blue)
javax.imageio包:
-
javax.imageio.ImageIO
自动封装多种ImageReader和ImageWriter,读写图像文件
read 读取图片 write 写图
-
java.awt.image.BufferedImage
图像在内存中的表示类
getHeight 获取高度
getWidth 获取宽度
public static void main(String[] args) throws Exception {
    readAndWrite();
    readComparison();
    cropImage("c:/temp/ecnu.jpg", "c:/temp/shida.jpg", 750, 250, 700, 300, "jpg", "jpg");
    combineImagesHorizontally("c:/temp/ecnu.jpg","c:/temp/ecnu.jpg","jpg", "c:/temp/ecnu2.jpg");
    combineImagesVertically("c:/temp/ecnu.jpg","c:/temp/ecnu.jpg","jpg", "c:/temp/ecnu3.jpg");
}
读和写图片
public static void readAndWrite() throws Exception {
    BufferedImage image = ImageIO.read(new File("c:/temp/ecnu.jpg"));
    System.out.println("Height: " + image.getHeight()); // 高度像素
    System.out.println("Width: " + image.getWidth()); // 宽度像素
    ImageIO.write(image, "png", new File("c:/temp/ecnu.png"));
}
切割矩形
/**
     * cropImage 将原始图片文件切割一个矩形,并输出到目标图片文件
     * @param fromPath 原始图片
     * @param toPath  目标图片
     * @param x       坐标起点x
     * @param y       坐标起点y
     * @param width   矩形宽度
     * @param height  矩形高度
     * @param readImageFormat  原始文件格式
     * @param writeImageFormat 目标文件格式
     * @throws Exception
     */
public static void cropImage(String fromPath, String toPath, int x, int y, int width, int height, String readImageFormat,String writeImageFormat) throws Exception {
    FileInputStream fis = null;
    ImageInputStream iis = null;
    try {
        // 读取原始图片文件
        fis = new FileInputStream(fromPath);
        Iterator<ImageReader> it = ImageIO.getImageReadersByFormatName(readImageFormat);
        ImageReader reader = it.next();
        iis = ImageIO.createImageInputStream(fis);
        reader.setInput(iis, true);

        // 定义一个矩形 并放入切割参数中
        ImageReadParam param = reader.getDefaultReadParam();
        Rectangle rect = new Rectangle(x, y, width, height);
        param.setSourceRegion(rect);

        //从源文件读取一个矩形大小的图像
        BufferedImage bi = reader.read(0, param);

        //写入到目标文件
        ImageIO.write(bi, writeImageFormat, new File(toPath));
    } finally {
        fis.close();
        iis.close();
    }
}
效果如下:

横向拼接
/**
     * 横向拼接两张图片,并写入到目标文件
     * 拼接的本质,就是申请一个大的新空间,然后将原始的图片像素点拷贝到新空间,最后保存
     * @param firstPath 第一张图片的路径
     * @param secondPath    第二张图片的路径
     * @param imageFormat   拼接生成图片的格式
     * @param toPath    目标图片的路径
     */
public static void combineImagesHorizontally(String firstPath, String secondPath,String imageFormat, String toPath){
    try {
        //读取第一张图片
        File  first  =  new  File(firstPath);
        BufferedImage  imageOne = ImageIO.read(first);
        int  width1  =  imageOne.getWidth();//图片宽度
        int  height1  =  imageOne.getHeight();//图片高度
        //从第一张图片中读取RGB
        int[]  firstRGB  =  new  int[width1*height1];
        firstRGB  =  imageOne.getRGB(0,0,width1,height1,firstRGB,0,width1);

        //对第二张图片做同样的处理
        File  second  =  new  File(secondPath);
        BufferedImage  imageTwo  =  ImageIO.read(second);
        int width2 = imageTwo.getWidth();
        int height2 = imageTwo.getHeight();
        int[]   secondRGB  =  new  int[width2*height2];
        secondRGB  =  imageTwo.getRGB(0,0,width2,height2,secondRGB,0,width2);

        //生成新图片
        int height3 = (height1>height2)?height1:height2; //挑选高度大的,作为目标文件的高度
        int width3  = width1 + width2;                   //宽度,两张图片相加
        BufferedImage  imageNew  =  new  BufferedImage(width3,height3,BufferedImage.TYPE_INT_RGB);

        //设置左半部分的RGB 从(0,0) 开始
        imageNew.setRGB(0,0,width1,height1,firstRGB,0,width1);
        //设置右半部分的RGB 从(width1, 0) 开始
        imageNew.setRGB(width1,0,width2,height2,secondRGB,0,width2);

        //保存图片
        ImageIO.write(imageNew,  imageFormat,  new  File(toPath));
    } catch (Exception e) {
        e.printStackTrace();
    }
}
效果如下

纵向拼接
/**
     * 纵向拼接图片(两张)
     * 拼接的本质,就是申请一个大的新空间,然后将原始的图片像素点拷贝到新空间,最后保存
     * @param firstPath 读取的第一张图片
     * @param secondPath    读取的第二张图片
     * @param imageFormat 图片写入格式
     * @param toPath    图片写入路径
     */
public static void combineImagesVertically(String firstPath, String secondPath,String imageFormat, String toPath){
    try {
        //读取第一张图片
        File  first  =  new  File(firstPath);
        BufferedImage  imageOne = ImageIO.read(first);
        int  width1  =  imageOne.getWidth();//图片宽度
        int  height1  =  imageOne.getHeight();//图片高度
        //从图片中读取RGB
        int[]  firstRGB  =  new  int[width1*height1];
        firstRGB  =  imageOne.getRGB(0,0,width1,height1,firstRGB,0,width1);

        //对第二张图片做相同的处理
        File  second  =  new  File(secondPath);
        BufferedImage  imageTwo  =  ImageIO.read(second);
        int width2 = imageTwo.getWidth();
        int height2 = imageTwo.getHeight();
        int[]   secondRGB  =  new  int[width2*height2];
        secondRGB  =  imageTwo.getRGB(0,0,width2,height2,secondRGB,0,width2);

        //生成新图片
        int width3 = (width1>width2)?width1:width2; //挑选宽度大的,作为目标文件的宽度
        int height3 = height1+height2;              //高度,两张图片相加
        BufferedImage  imageNew  =  new  BufferedImage(width3,height3,BufferedImage.TYPE_INT_RGB);
        //设置上半部分的RGB 从(0,0) 开始
        imageNew.setRGB(0,0,width1,height1,firstRGB,0,width1);
        //设置下半部分的RGB 从(0, height1) 开始
        imageNew.setRGB(0,height1,width2,height2,secondRGB,0,width2);

        //保存图片
        ImageIO.write(imageNew, imageFormat, new File(toPath));
    } catch (Exception e) {
        e.printStackTrace();
    }
}
应用 验证码的生成
题目要求

public class ValidateCodeTest {

    //没有1 I L 0 o
    static char[] codeSequence = { 'A', 'B', 'C', 'D', 'E', 'F', 'G', 'H', 'J', 'K', 'M', 'N', 'P', 'Q', 'R', 'S', 'T',
            'U', 'V', 'W', 'X', 'Y', 'Z', '2', '3', '4', '5', '6', '7', '8', '9' };
    static int charNum = codeSequence.length;

    public static void main(String[] a) throws IOException
    {
        generateCode("c:/temp/code.jpg");
    }

    public static void generateCode(String filePath) throws IOException {
        // 首先定义验证码图片框
        int width = 80; // 验证码图片的宽度
        int height = 32; // 验证码图片的高度
        BufferedImage buffImg = new BufferedImage(width, height, BufferedImage.TYPE_INT_RGB);

        //定义图片上的图形和干扰线
        Graphics2D gd = buffImg.createGraphics();
        gd.setColor(Color.LIGHT_GRAY);   // 将图像填充为浅灰色
        gd.fillRect(0, 0, width, height);
        gd.setColor(Color.BLACK);        // 画边框。
        gd.drawRect(0, 0, width - 1, height - 1);
        // 随机产生16条灰色干扰线,使图像中的认证码不易识别
        gd.setColor(Color.gray);
        // 创建一个随机数生成器类   用于随机产生干扰线
        Random random = new Random();
        for (int i = 0; i < 16; i++) {
            int x = random.nextInt(width);
            int y = random.nextInt(height);
            int xl = random.nextInt(12);
            int yl = random.nextInt(12);
            gd.drawLine(x, y, x + xl, y + yl);
        }

        //计算字的位置坐标
        int codeCount = 4; // 字符个数
        int fontHeight; // 字体高度
        int codeX; // 第一个字符的x坐标,因为后面的字符坐标依次递增,所以它们的x轴值是codeX的倍数
        int codeY; // 验证字符的y坐标,因为并排所以值一样
        // width-4 除去左右多余的位置,使验证码更加集中显示,减得越多越集中。
        // codeCount+1 //等比分配显示的宽度,包括左右两边的空格
        codeX = (width - 4) / (codeCount + 1); //第一个字母的起始位置
        fontHeight = height - 10;  // height - 10 高度中间区域显示验证码
        codeY = height - 7;

        // 创建字体,字体的大小应该根据图片的高度来定。
        Font font = new Font("Fixedsys", Font.PLAIN, fontHeight);
        gd.setFont(font);

        // 随机产生codeCount数字的验证码。
        for (int i = 0; i < codeCount; i++) {
            // 每次随机拿一个字母,赋予随机的颜色
            String strRand = String.valueOf(codeSequence[random.nextInt(charNum)]);
            int red = random.nextInt(255);
            int green = random.nextInt(255);
            int blue = random.nextInt(255);
            gd.setColor(new Color(red,green,blue));
            //把字放到图片上!!!
            gd.drawString(strRand, (i + 1) * codeX, codeY);
        }

        ImageIO.write(buffImg, "jpg", new File(filePath));
    }
}
应用 统计图生成
包括柱状图、饼图、折线图
public static void main(String[] args) {
    writeBar("c:/temp/bar.jpg"); // 柱状图
    writePie("c:/temp/pie.jpg"); // 饼图
    writeLine("c:/temp/line.jpg");// 折线图
}

public static StandardChartTheme getChineseTheme()
{
    StandardChartTheme chineseTheme = new StandardChartTheme("CN");
    chineseTheme.setExtraLargeFont(new Font("隶书", Font.BOLD, 20));
    chineseTheme.setRegularFont(new Font("宋书", Font.PLAIN, 15));
    chineseTheme.setLargeFont(new Font("宋书", Font.PLAIN, 15));
    return chineseTheme;
}
柱状图
public static void writeBar(String fileName) {
    DefaultCategoryDataset dataset = new DefaultCategoryDataset();
    dataset.addValue(11, "", "第一季度");
    dataset.addValue(41, "", "第二季度");
    dataset.addValue(51, "", "第三季度");
    dataset.addValue(4, "", "第四季度");

    // PlotOrientation.HORIZONTAL横向 PlotOrientation.VERTICAL 竖向
    // 引入中文主题样式
    ChartFactory.setChartTheme(getChineseTheme());
    JFreeChart chart = ChartFactory.createBarChart3D("柱状图", "2018年", "产品总量", dataset, PlotOrientation.VERTICAL,
                                                     false, false, false);

    try {
        ChartUtilities.saveChartAsJPEG(new File(fileName), chart, 600, 300);
    } catch (IOException e) {
        e.printStackTrace();
    }

}
饼图
public static void writePie(String fileName) {
    DefaultPieDataset pds = new DefaultPieDataset();
    pds.setValue("C人数", 100);
    pds.setValue("C++人数", 200);
    pds.setValue("Java人数", 300);
    try {
        ChartFactory.setChartTheme(getChineseTheme());
        JFreeChart chart = ChartFactory.createPieChart("饼图", pds);

        ChartUtilities.saveChartAsJPEG(new File(fileName), chart, 600, 300);
    } catch (Exception e) {
        e.printStackTrace();
    }
}
折线图,双折线图
public static void writeLine(String fileName) {
    DefaultCategoryDataset lines = new DefaultCategoryDataset();
    //第一条线
    lines.addValue(100, "Java核心技术", "1月");
    lines.addValue(200, "Java核心技术", "2月");
    lines.addValue(400, "Java核心技术", "3月");
    lines.addValue(500, "Java核心技术", "4月");

    //第二条线
    lines.addValue(100, "Java核心技术(进阶)", "1月");
    lines.addValue(400, "Java核心技术(进阶)", "2月");
    lines.addValue(900, "Java核心技术(进阶)", "3月");
    try {
        ChartFactory.setChartTheme(getChineseTheme());
        JFreeChart chart = ChartFactory.createLineChart("折线图", "时间", "人数", lines);
        ChartUtilities.saveChartAsJPEG(new File(fileName), chart, 600, 300);
    } catch (Exception e) {
        e.printStackTrace();
    }
}
4.6 条形码和二维码解析
两个处理二维码的第三方库
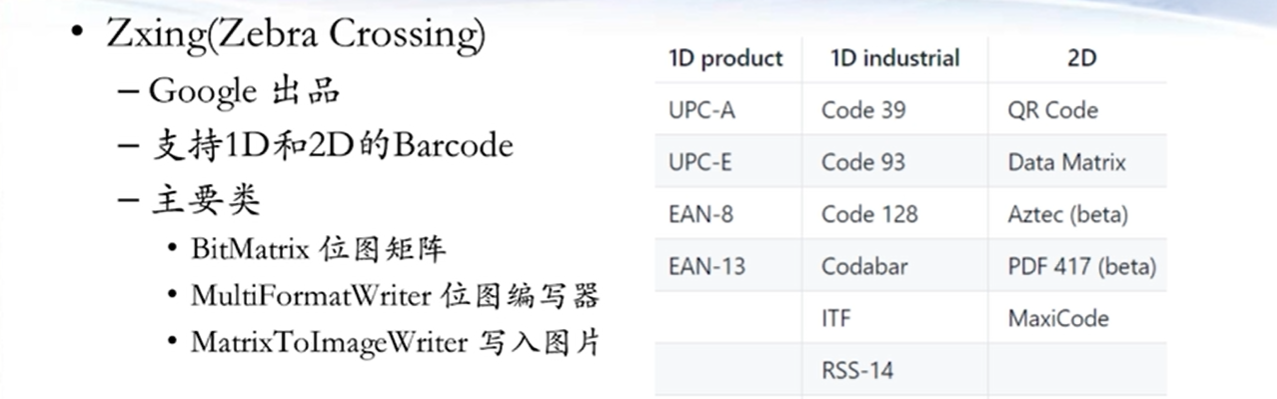
只要我们把内容提供给zebra crossing,他就会自动生成好二维码,也可以解析
下面是生成和解析百度网址二维码的例子,我们需要改动的只有file name和content内容
public class QRCodeTest {
    /*
     * 定义二维码的宽高
     */
    private static int WIDTH = 300;
    private static int HEIGHT = 300;
    private static String FORMAT = "png";//二维码格式

    //生成二维码
    public static void generateQRCode(File file, String content) {
        //定义二维码参数
        Map<EncodeHintType, Object> hints = new HashMap<>();

        hints.put(EncodeHintType.CHARACTER_SET, "utf-8");//设置编码
        hints.put(EncodeHintType.ERROR_CORRECTION, ErrorCorrectionLevel.M);//设置容错等级
        hints.put(EncodeHintType.MARGIN, 2);//设置边距默认是5

        try {
            BitMatrix bitMatrix = new MultiFormatWriter().encode(content, BarcodeFormat.QR_CODE, WIDTH, HEIGHT, hints);
            Path path = file.toPath();
            MatrixToImageWriter.writeToPath(bitMatrix, FORMAT, path);//写到指定路径下

        } catch (Exception e) {
            e.printStackTrace();
        }

    }

    //读取二维码
    public static void readQrCode(File file) {
        MultiFormatReader reader = new MultiFormatReader();
        try {
            BufferedImage image = ImageIO.read(file);
            BinaryBitmap binaryBitmap = new BinaryBitmap(new HybridBinarizer(new BufferedImageLuminanceSource(image)));
            Map<DecodeHintType, Object> hints = new HashMap<>();
            hints.put(DecodeHintType.CHARACTER_SET, "utf-8");//设置编码
            Result result = reader.decode(binaryBitmap, hints);
            System.out.println("解析结果:" + result.toString());
            System.out.println("二维码格式:" + result.getBarcodeFormat());
            System.out.println("二维码文本内容:" + result.getText());
        } catch (Exception e) {
            e.printStackTrace();
        }
    }

    public static void main(String[] args) {
        generateQRCode(new File("2dcode.png"), "https://www.baidu.com");
        readQrCode(new File("2dcode.png"));
        //readQrCode(new File("2dcode.jpg"));
    }
}
第二个第三方库barcode4j
它只能生成二维码,不能解析二维码
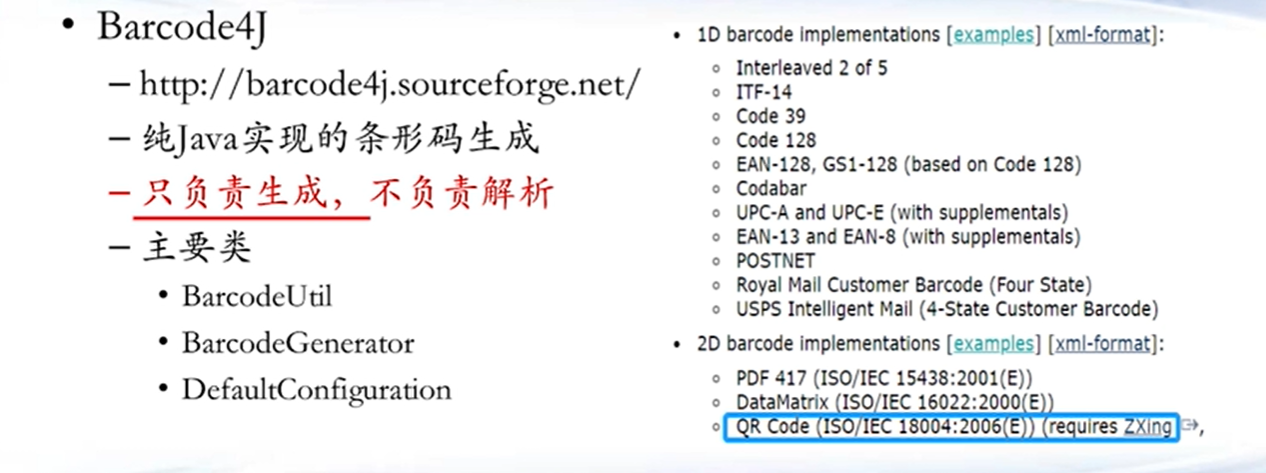
另外,要想使用这两个包,必须在pom.xml里面引入配置文件
<dependency>
    <groupId>com.google.zxing</groupId>
    <artifactId>core</artifactId>
    <version>3.3.3</version>
</dependency>
<!-- https://mvnrepository.com/artifact/com.google.zxing/javase -->
<dependency>
    <groupId>com.google.zxing</groupId>
    <artifactId>javase</artifactId>
    <version>3.3.3</version>
</dependency>
<!-- https://mvnrepository.com/artifact/net.sf.barcode4j/barcode4j -->
<dependency>
    <groupId>net.sf.barcode4j</groupId>
    <artifactId>barcode4j</artifactId>
    <version>2.1</version>
</dependency>
<!-- https://mvnrepository.com/artifact/org.apache.avalon.framework/avalon-framework-api -->
<dependency>
    <groupId>org.apache.avalon.framework</groupId>
    <artifactId>avalon-framework-api</artifactId>
    <version>4.3.1</version>
</dependency>
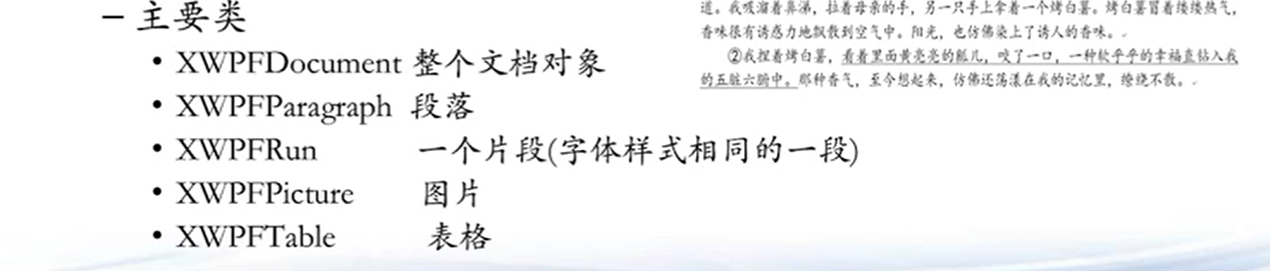
4.7 DOCX文件解析
word2003以前文档格式是doc,文档格式不公开
word2007以后文档格式是docx,遵循xml路线,文档格式公开
常见功能:docx解析,docx生成
java没办法处理docx,用到的第三方库,我们主要用到POI
POI是一个纯java的工具包,不需要引入第三方的依赖
这一节的例子:
-
读取docx文件的text
-
读取docx文件里的图片
-
写入图片
-
读取docx文件里的表格
-
将数据写入docx文件的表格里
-
文档模板替换功能,套打功能
就是把文件里占位符换成真实的数据

4.8 表格文件的处理
xls和xlxs文件:sheet,行,列,单元格
csv文件
用到的第三方包:POI

写xlsx文件
public static void writeXLSXFile() throws IOException
{

    String excelFileName = "Test.xlsx";// name of excel file
    String sheetName = "Sheet1";// name of sheet

    XSSFWorkbook wb = new XSSFWorkbook();
    XSSFSheet sheet = wb.createSheet(sheetName);

    // iterating r number of rows
    for (int r = 0; r < 5; r++)
    {
        XSSFRow row = sheet.createRow(r);

        // iterating c number of columns
        for (int c = 0; c < 5; c++)
        {
            XSSFCell cell = row.createCell(c);

            cell.setCellValue("Cell " + r + " " + c);
        }
    }

    FileOutputStream fileOut = new FileOutputStream(excelFileName);

    // write this workbook to an Outputstream.
    wb.write(fileOut);
    fileOut.flush();
    fileOut.close();
}
读xlsx文件
public static void readXLSXFile() throws IOException
{
    InputStream ExcelFileToRead = new FileInputStream("Test.xlsx");
    XSSFWorkbook wb = new XSSFWorkbook(ExcelFileToRead);

    XSSFSheet sheet = wb.getSheetAt(0);
    XSSFRow row;
    XSSFCell cell;

    Iterator rows = sheet.rowIterator();

    while (rows.hasNext())
    {
        row = (XSSFRow) rows.next();
        Iterator cells = row.cellIterator();
        while (cells.hasNext())
        {
            cell = (XSSFCell) cells.next();

            if (cell.getCellType() == XSSFCell.CELL_TYPE_STRING)
            {
                System.out.print(cell.getStringCellValue() + " ");
            }
            else if (cell.getCellType() == XSSFCell.CELL_TYPE_NUMERIC)
            {
                System.out.print(cell.getNumericCellValue() + " ");
            }
            else
            {
                // U Can Handel Boolean, Formula, Errors
            }
        }
        System.out.println();
    }

}
读csv文件
以逗号分隔的文本文件,可以用excel打开变成表格
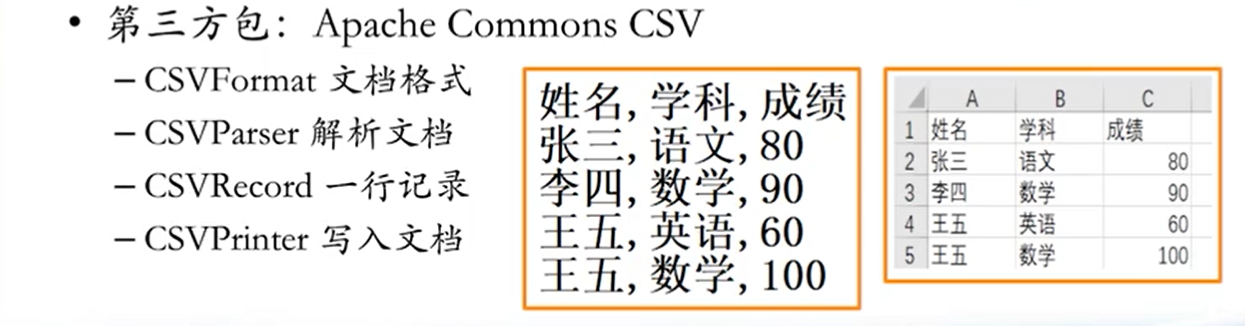
根据索引值获取csv文件数据
public static void readCSVWithIndex() throws Exception {
    Reader in = new FileReader("c:/temp/score.csv");
    Iterable<CSVRecord> records = CSVFormat.EXCEL.parse(in);
    for (CSVRecord record : records) {
        System.out.println(record.get(0)); //0 代表第一列
    }
}
根据列名来获取列,在读入的时候给每个列取个名字
public static void readCSVWithName() throws Exception {
    Reader in = new FileReader("c:/temp/score.csv");
    Iterable<CSVRecord> records = CSVFormat.RFC4180.withHeader("Name", "Subject", "Score").parse(in);
    for (CSVRecord record : records) {
        System.out.println(record.get("Subject"));
    }
}
写csv文件
public static void writeCSV() throws Exception {
    try (CSVPrinter printer = new CSVPrinter(new FileWriter("person.csv"), CSVFormat.EXCEL)) {
        printer.printRecord("id", "userName", "firstName", "lastName", "birthday");
        printer.printRecord(1, "john73", "John", "Doe", LocalDate.of(1973, 9, 15));
        printer.println();  //空白行
        printer.printRecord(2, "mary", "Mary", "Meyer", LocalDate.of(1985, 3, 29));
    } catch (IOException ex) {
        ex.printStackTrace();
    }
}
4.9 PDF文件的处理
portable document 便携式文档格式


抽取pdf的文本
public static void main(String[] args){

    File pdfFile = new File("simple.pdf");
    PDDocument document = null;
    try
    {
        document=PDDocument.load(pdfFile);

        AccessPermission ap = document.getCurrentAccessPermission();
        if (!ap.canExtractContent())
        {
            throw new IOException("你没有权限抽取文本");
        }
        // 获取页码
        int pages = document.getNumberOfPages();

        // 读文本内容
        PDFTextStripper stripper=new PDFTextStripper();
        // 设置按顺序输出
        stripper.setSortByPosition(true);
        stripper.setStartPage(1);  //起始页
        stripper.setEndPage(pages);//结束页
        String content = stripper.getText(document);
        System.out.println(content);
    }
    catch(Exception e)
    {
        System.out.println(e);
    }
}
写pdf
public static void main(String[] args) {
    createHelloPDF();
}
public static void createHelloPDF() {
    PDDocument doc = null;
    PDPage page = null;

    try {
        doc = new PDDocument();
        page = new PDPage();
        doc.addPage(page);
        PDFont font = PDType1Font.HELVETICA_BOLD;
        PDPageContentStream content = new PDPageContentStream(doc, page);
        content.beginText();
        content.setFont(font, 12);
        content.moveTextPositionByAmount(100, 700);
        content.showText("hello world");

        content.endText();
        content.close();
        doc.save("test.pdf");
        doc.close();
    } catch (Exception e) {
        System.out.println(e);
    }
}
合并两个pdf
private static final Log LOG = LogFactory.getLog(NewMergePdfs.class);

public static void main(String[] a) throws Exception
{
    merge();
}

public static void merge() throws Exception
{
    FileOutputStream  fos = new FileOutputStream(new File("merge.pdf"));

    ByteArrayOutputStream mergedPDFOutputStream = null;
    File file1 = new File("sample1.pdf");
    File file2 = new File("sample2.pdf");

    List<InputStream> sources = new ArrayList<InputStream>();

    try
    {
        sources.add(new FileInputStream(file1));
        sources.add(new FileInputStream(file2));

        mergedPDFOutputStream = new ByteArrayOutputStream();

        //设定来源和目标
        PDFMergerUtility pdfMerger = new PDFMergerUtility();
        pdfMerger.addSources(sources);
        pdfMerger.setDestinationStream(mergedPDFOutputStream);

        //设置合并选项
        PDDocumentInformation pdfDocumentInfo = new PDDocumentInformation();
        pdfMerger.setDestinationDocumentInformation(pdfDocumentInfo);

        //合并
        pdfMerger.mergeDocuments(MemoryUsageSetting.setupMainMemoryOnly());

        fos.write(mergedPDFOutputStream.toByteArray());
        fos.close();
    }
    catch (Exception e)
    {
        throw new IOException("PDF merge problem", e);
    }
    finally
    {
        for (InputStream source : sources)
        {
            IOUtils.closeQuietly(source);
        }
        IOUtils.closeQuietly(mergedPDFOutputStream);
        IOUtils.closeQuietly(fos);
    }
}
删除一页pdf
public static void main(String[] args) throws Exception {
    File file = new File("merge.pdf");
    PDDocument document = PDDocument.load(file);

    int noOfPages = document.getNumberOfPages();
    System.out.println("total pages: " + noOfPages);

    // 删除第1页
    document.removePage(1);  // 页码索引从0开始算

    System.out.println("page removed");

    // 另存为新文档
    document.save("merge2.pdf");

    document.close();
}
XdocReport类
主要用途是将docx文档转换为pdf/html….
public class XDocReportTest {

    public static void main(String[] args) throws Exception {
        XWPFDocument doc = new XWPFDocument(new FileInputStream("template.docx"));// docx
        PdfOptions options = PdfOptions.create();
        options.fontProvider(new IFontProvider() {
            // 设置中文字体
            public Font getFont(String familyName, String encoding, float size, int style, Color color) {
                try {
                    BaseFont bfChinese = BaseFont.createFont(
                            "C:\\Program Files (x86)\\Microsoft Office\\root\\VFS\\Fonts\\private\\STSONG.TTF",
                            BaseFont.IDENTITY_H, BaseFont.EMBEDDED);
                    Font fontChinese = new Font(bfChinese, size, style, color);
                    if (familyName != null)
                        fontChinese.setFamily(familyName);
                    return fontChinese;
                } catch (Throwable e) {
                    e.printStackTrace();
                    return ITextFontRegistry.getRegistry().getFont(familyName, encoding, size, style, color);
                }
            }
        });
        PdfConverter.getInstance().convert(doc, new FileOutputStream("template.pdf"), options);// pdf
    }
}
第五章 java多线程和并发线程
串行程序,程序只能在单核上运行,无法利用多个cpu
并行程序,程序可以利用多个计算核运行
5.1 多线程的生命周期
java多线程的创建
有两种方法
线程继承(extends)java.lang.Thread类,实现run方法
public class Thread1 extends Thread{
    public void run()
    {
        System.out.println("hello");
    }
    public static void main(String[] a)
    {
        new Thread1().start();
    }
}
线程实现(implement)java.lang.Runnable类,实现run方法
runnable是java四个主要接口之一:Clonable/Comparable/Serializable/Runnable
public class Thread2 implements Runnable{
    public void run()
    {
        System.out.println("hello");
    }
    public static void main(String[] a)
    {
        new Thread(new Thread2()).start();
    }
}
java多线程的启动
两种创建方式不同,启动方式也是不同的
多个线程启动,其启动的先后顺序是随机的
1.通过继承Thread类创建的线程
start方法,会自动以新线程调用run方法,请注意要是直接调用run,会变成串行执行
一个线程对象不能多次start,会报错,多个线程对象都start后,哪一个线程先执行完全由操作系统/JVM来主导
public class ThreadDemo1
{
    public static void main(String args[]) throws Exception
    {
        new TestThread1().start();
        while(true)
        {
            System.out.println("main thread is running");
            Thread.sleep(1000);
        }
    }
}

class TestThread1 extends Thread
{
    public void run()
    {
        while(true)
        {
            System.out.println(" TestThread1 is running");
            try {
                Thread.sleep(1000); //1000毫秒
            } catch (InterruptedException e) {
                // TODO Auto-generated catch block
                e.printStackTrace();
            }
        }
    }
}
2.通过实现Runnable类创建的线程
注意Runnable对象必须放在一个Thread类中才能运行,不能直接对一个Runnable对象执行start方法
public class ThreadDemo3
{
    public static void main(String args[])
    {
        TestThread3 tt= new TestThread3();//创建TestThread类的一个实例
        //new TestThread3().start();会报错
        Thread t= new Thread(tt);//创建一个Thread类的实例
        t.start();//使线程进入Runnable状态
        while(true)
        {
            System.out.println("main thread is running");
            try {
                Thread.sleep(1000);
            } catch (InterruptedException e) {
                e.printStackTrace();
            }
        }
    }
}

class TestThread3 implements Runnable //extends Thread
{
    public void run()
    {
        while(true)
        {
            System.out.println(Thread.currentThread().getName() +" is running");
            try {
                Thread.sleep(1000);
            } catch (InterruptedException e) {
                e.printStackTrace();
            }
        }
    }
}
java多线程的结束
线程无需关闭,只要run执行完之后就自动结束了
main函数线程可能早于新线程结束,整个程序的终止是等所有线程都中止
5.2 多线程信息共享
粗粒度:子线程与子线程之间和main线程之间缺乏交流
细粒度:线程之间有信息交流通讯(通过共享变量达到信息共享,有两种方法:static变量/同一个Runnable类的成员变量)
static变量实例
public class ThreadDemo0
{
    public static void main(String [] args)
    {
        new TestThread0().start();
        new TestThread0().start();
        new TestThread0().start();
        new TestThread0().start();
    }
}
class TestThread0 extends Thread
{
    //private int tickets=100;           //每个线程卖100张,没有共享
    private static int tickets=100;  //static变量是共享的,所有的线程共享
    public void run()
    {
        while(true)
        {
            if(tickets>0)
            {
                System.out.println(Thread.currentThread().getName() +
                " is selling ticket " + tickets);
                tickets = tickets - 1;
            }
            else
            {
                break;
            }
        }
    }
}
同一个Runnable类的成员变量实例
注意TestThread1只被创建了一次,就是t,而new Thread只是把同一个t包装成不同的线程对象启动
public class ThreadDemo1
{
    public static void main(String [] args)
    {
        TestThread1 t=new TestThread1();
        new Thread(t).start();
        new Thread(t).start();
        new Thread(t).start();
        new Thread(t).start();
    }
}
class TestThread1 implements Runnable
{
    private int tickets=100;
    public void run()
    {
        while(true)
        {
            if(tickets>0)
            {
                try {
                    Thread.sleep(100);
                } catch (InterruptedException e) {
                    e.printStackTrace();
                }
                tickets--;
                System.out.println(Thread.currentThread().getName() +" is selling ticket " + tickets);
            }
            else
            {
                break;
            }

        }
    }
}
多线程信息共享问题:
1.工作缓存副本
2.关键步骤缺乏加锁限制
缓存副本解决方法:volatile关键字修饰变量,可以让所有线程都立即看到这个值的变化
public class ThreadDemo2
{
    public static void main(String args[]) throws Exception
    {
        TestThread2 t = new TestThread2();
        t.start();
        Thread.sleep(2000);
        t.flag = false;
        System.out.println("main thread is exiting");
    }
}

class TestThread2 extends Thread
{
    //boolean flag = true;   //子线程不会停止
    volatile boolean flag = true;  //用volatile修饰的变量可以及时在各线程里面通知
    public void run()
    {
        int i=0;
        while(flag)
        {i++;}
        System.out.println("test thread3 is exiting");
    }
}
加锁限制解决方法:
互斥指某一个线程运行一个代码段,其他线程不能运行
同步指多个线程的运行,必须按照某一种规定的先后顺序,是互斥的特例
被synchronized关键字修饰的代码块或函数,只能一个线程进入
public class ThreadDemo3 {
    public static void main(String[] args) {
        TestThread3 t = new TestThread3();
        new Thread(t, "Thread-0").start();
        new Thread(t, "Thread-1").start();
        new Thread(t, "Thread-2").start();
        new Thread(t, "Thread-3").start();
    }
}

class TestThread3 implements Runnable {
    private volatile int tickets = 10; // 多个 线程在共享的

    public void run() {
        while (true) {
            sale();
            try {
                Thread.sleep(100);
            } catch (Exception e) {
                System.out.println(e.getMessage());
            }
            if (tickets <= 0) {break;}
        }
    }

    public synchronized void sale() { // 同步函数
        if (tickets > 0) {
            System.out.println(Thread.currentThread().getName() + " is saling ticket " + tickets--);
        }
    }
}
//OUTPUT

Thread-0 is saling ticket 10
Thread-3 is saling ticket 9
Thread-2 is saling ticket 8
Thread-1 is saling ticket 7
Thread-1 is saling ticket 6
Thread-2 is saling ticket 5
Thread-3 is saling ticket 4
Thread-0 is saling ticket 3
Thread-3 is saling ticket 2
Thread-2 is saling ticket 1
5.3 多线程管理
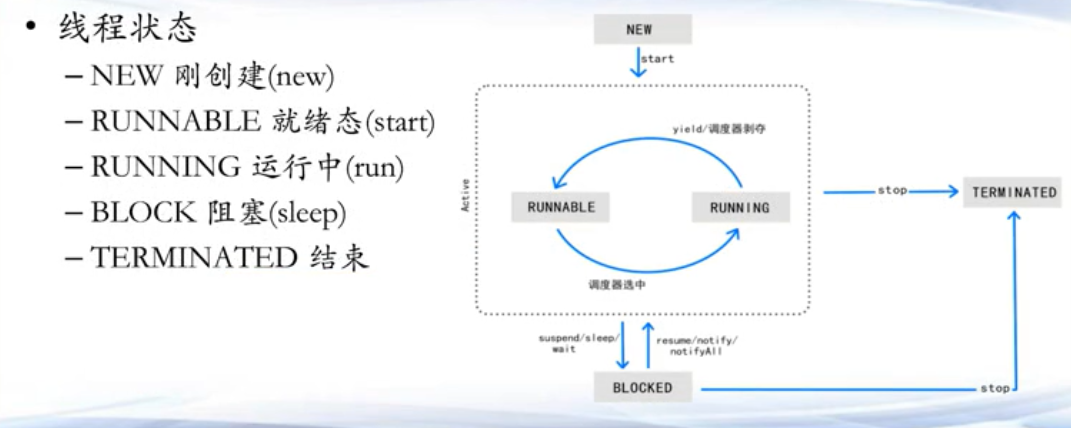
线程的阻塞和唤醒
sleep,时间一到,自己会醒来
–wait/notify/notifyAll,等待,需要别人来唤醒
– join,等待另外一个线程结束
– interrupt,向另外一个线程发送中断信号,该线程收到信号,会
触发InterruptedException(可解除阻塞),并进行下一步处
5.5 java并发框架 executor
java并行模式

线程组的管理,就是有很多的线程类的时候,怎么把他放在一起进行管理

线程组如何管理线程

但线程组并没有解决高耦合的问题,所以我们引入了框架


下面看代码
main函数里就是两件事,创建服务器,创建100个任务
现在可以不知道这个任务具体指什么,但我们先创建出来
public class Main {

    public static void main(String[] args) throws InterruptedException {
        // 创建一个执行服务器
        Server server=new Server();

        // 创建100个任务,并发给执行器,等待完成
        for (int i=0; i<100; i++){
            Task task=new Task("Task "+i);
            Thread.sleep(10);
            server.submitTask(task);
        }
        server.endServer();
    }
}
服务器端
submittask是我们外界创建任务时调用的,向线程池提交任务
其中executor.execute(task); //执行
public class Server {

    //线程池
    private ThreadPoolExecutor executor;

    public Server(){
        executor=(ThreadPoolExecutor)Executors.newCachedThreadPool();
        //executor=(ThreadPoolExecutor)Executors.newFixedThreadPool(5);
    }

    //向线程池提交任务
    public void submitTask(Task task){
        System.out.printf("Server: A new task has arrived\n");
        executor.execute(task); //执行  无返回值

        System.out.printf("Server: Pool Size: %d\n",executor.getPoolSize());
        System.out.printf("Server: Active Count: %d\n",executor.getActiveCount());
        System.out.printf("Server: Completed Tasks: %d\n",executor.getCompletedTaskCount());
    }

    public void endServer() {
        executor.shutdown();
    }
}
任务端
主要的任务代码写在这里
package executor.example1;

import java.util.Date;
import java.util.concurrent.TimeUnit;
/**
 * Task 任务类
 * @author Tom
 *
 */
public class Task implements Runnable {

    private String name;

    public Task(String name){
        this.name=name;
    }

    public void run() {
        try {
            Long duration=(long)(Math.random()*1000);
            System.out.printf("%s: Task %s: Doing a task during %d seconds\n",Thread.currentThread().getName(),name,duration);
            Thread.sleep(duration);
        } catch (InterruptedException e) {
            e.printStackTrace();
        }

        System.out.printf("%s: Task %s: Finished on: %s\n",Thread.currentThread().getName(),name,new Date());
    }
}
再看一个复杂的例子
0-1000的数求和
分成10个任务,线程池固定只有4个线程
public class SumTest {

    public static void main(String[] args) {

        // 执行线程池
        ThreadPoolExecutor executor=(ThreadPoolExecutor)Executors.newFixedThreadPool(4);
        List<Future<Integer>> resultList=new ArrayList<>();

        //统计1-1000总和,分成10个任务计算,提交任务
        for (int i=0; i<10; i++){
            SumTask calculator=new SumTask(i*100+1, (i+1)*100);
            Future<Integer> result=executor.submit(calculator);
            resultList.add(result);
        }

        // 每隔50毫秒,轮询等待10个任务结束
        do {
            System.out.printf("Main: 已经完成多少个任务: %d\n",executor.getCompletedTaskCount());
            for (int i=0; i<resultList.size(); i++) {
                Future<Integer> result=resultList.get(i);
                System.out.printf("Main: Task %d: %s\n",i,result.isDone());
            }
            try {
                Thread.sleep(50);
            } catch (InterruptedException e) {
                e.printStackTrace();
            }
        } while (executor.getCompletedTaskCount()<resultList.size());

        // 所有任务都已经结束了,综合计算结果
        int total = 0;
        for (int i=0; i<resultList.size(); i++) {
            Future<Integer> result=resultList.get(i);
            Integer sum=null;
            try {
                sum=result.get();
                total = total + sum;
            } catch (InterruptedException e) {
                e.printStackTrace();
            } catch (ExecutionException e) {
                e.printStackTrace();
            }
        }
        System.out.printf("1-1000的总和:" + total);

        // 关闭线程池
        executor.shutdown();
    }
}
任务类
继承了callable的方法,不同的是把run()写为call(),并且call()是有返回值的
public class SumTask implements Callable<Integer> {
    //定义每个线程计算的区间
    private int startNumber;
    private int endNumber;

    public SumTask(int startNumber, int endNumber){
        this.startNumber=startNumber;
        this.endNumber=endNumber;
    }

    @Override
    public Integer call() throws Exception {
        int sum = 0;
        for(int i=startNumber; i<=endNumber; i++)
        {
            sum = sum + i;
        }

        Thread.sleep(new Random().nextInt(1000));

        System.out.printf("%s: %d\n",Thread.currentThread().getName(),sum);
        return sum;
    }
}
5.6 Fork-join
这是一种分治编程

下面例子用fork-join来求一个数组和
sumtask实现了RecursiveTask,一个可递归的任务,必须实现compute()方法
//分任务求和
public class SumTask extends RecursiveTask<Long> {

    private int start;
    private int end;

    public SumTask(int start, int end) {
        this.start = start;
        this.end = end;
    }

    public static final int threadhold = 5;

    @Override
    protected Long compute() {
        Long sum = 0L;

        // 如果任务足够小, 就直接执行
        boolean canCompute = (end - start) <= threadhold;
        if (canCompute) {
            for (int i = start; i <= end; i++) {
                sum = sum + i;
            }
        } else {
            // 任务大于阈值, 分裂为2个任务
            int middle = (start + end) / 2;
            SumTask subTask1 = new SumTask(start, middle);
            SumTask subTask2 = new SumTask(middle + 1, end);

            invokeAll(subTask1, subTask2);

            Long sum1 = subTask1.join();
            Long sum2 = subTask2.join();

            // 结果合并
            sum = sum1 + sum2;
        }
        return sum;
    }
}
主程序
//分任务求和
public class SumTest {

    public static void main(String[] args) throws ExecutionException, InterruptedException {
        //创建执行线程池
        ForkJoinPool pool = new ForkJoinPool();
        //ForkJoinPool pool = new ForkJoinPool(4);

        //创建任务
        SumTask task = new SumTask(1, 10000000);

        //提交任务
        ForkJoinTask<Long> result = pool.submit(task);

        //等待结果
        do {
            System.out.printf("Main: Thread Count: %d\n",pool.getActiveThreadCount());
            System.out.printf("Main: Paralelism: %d\n",pool.getParallelism());
            try {
                Thread.sleep(50);
            } catch (InterruptedException e) {
                e.printStackTrace();
            }
        } while (!task.isDone());

        //输出结果
        System.out.println(result.get().toString());
    }
}
5.9 定时任务执行
固定某个时间点执行,或者周期性执行、
简单定时机制
executor+定时器
executeAtFixTime() 在指定时间点启动
executeFixedRate() 每三秒钟执行一次
executeFixedDelay() 跟上个函数差不多,不同的是从上个任务结束时间开始算三秒
package schedule;

import java.util.Date;
import java.util.concurrent.Executors;
import java.util.concurrent.ScheduledExecutorService;
import java.util.concurrent.TimeUnit;

public class ScheduledExecutorTest {

    public static void main(String[] a) throws Exception
    {
        //executeAtFixTime();
        //executeFixedRate();  //3s
        executeFixedDelay();  //4s
    }

    public static void executeAtFixTime() throws Exception {
        ScheduledExecutorService executor = Executors.newScheduledThreadPool(1);
        executor.schedule(
                new MyTask(),
                1,
                TimeUnit.SECONDS);

        Thread.sleep(20000);
        executor.shutdown();
    }

    /**
     * 周期任务 固定速率 是以上一个任务开始的时间计时,period时间过去后,检测上一个任务是否执行完毕,
     * 如果上一个任务执行完毕,则当前任务立即执行,如果上一个任务没有执行完毕,则需要等上一个任务执行完毕后立即执行。
     * @throws Exception
     */
    public static void executeFixedRate() throws Exception {
        ScheduledExecutorService executor = Executors.newScheduledThreadPool(1);
        executor.scheduleAtFixedRate(
                new MyTask(),
                1,
                3000,
                TimeUnit.MILLISECONDS);

        Thread.sleep(20000);
        executor.shutdown();
    }

    /**
     * 周期任务 固定延时 是以上一个任务结束时开始计时,period时间过去后,立即执行。
     * @throws Exception
     */
    public static void executeFixedDelay() throws Exception {
        ScheduledExecutorService executor = Executors.newScheduledThreadPool(1);
        executor.scheduleWithFixedDelay(
                new MyTask(),
                1,
                3000,
                TimeUnit.MILLISECONDS);

        Thread.sleep(20000);
        executor.shutdown();
    }
}

class MyTask implements Runnable {
    public void run() {
        System.out.println("时间为:" + new Date());
        try {
            Thread.sleep(1000);
        } catch (InterruptedException e) {
            e.printStackTrace();
        }
        //System.out.println("时间为:" + new Date());
    }
}
Quartz
有trigger这个概念,可以控制执行次数
第六章 网络编程
6.1 网络基础
每个计算设备上都有若干个网卡,每个网卡上有(全球唯一)单独的硬件地址,MAC地址
IP地址:每个网卡/机器都有一个或多个IP地址
Windows平台ipconfig, Linux/Mac平台ifconfig:查询ip地址
在Windows/Linux/Mac上都可以通过netstat -an:查询端口
公网(万维网/互联网)和内网(局域网):网络是分层的,最外层是公网/互联网,底下的每层都是内网
ip地址可以在每个层次的网重用,tracert 看当前机器 和目标机器的访问中继

6.2 java UDP协议
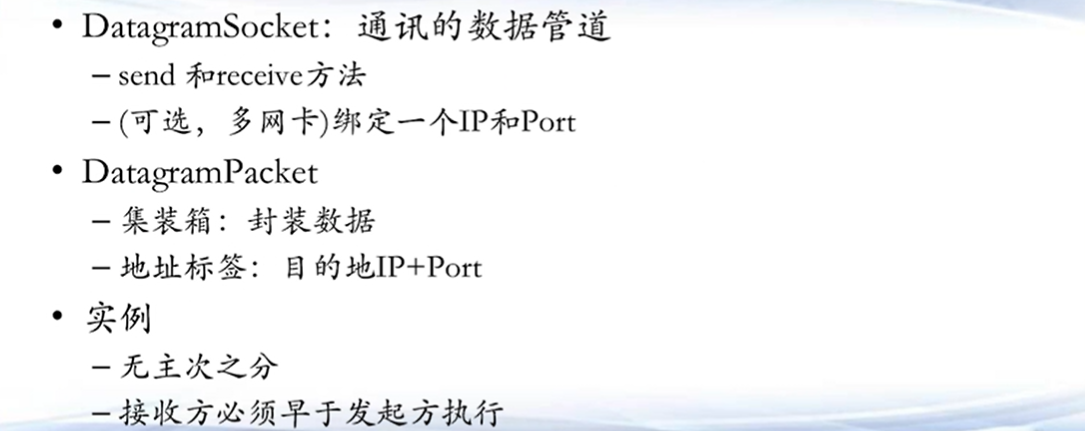
计算机通讯:数据从一个IP的port出发(发送方),运输到另外一个IP的port(接收方)
无连接无状态的通讯协议:发送方发送消息,如果接收方刚好在目的地,则可以接受。如果不在,那这个消息就丢失了,发送方也无法得知是否发送成功
UDP的好处就是简单,节省,经济
UDPsender
发送信息给指定端口
先定义管道DatagramSocket,再定义集装箱DatagramPacket
import java.net.*;
public class UdpSend
{
    public static void main(String [] args) throws Exception
    {
        DatagramSocket ds=new DatagramSocket();
        String str="hello world";
        DatagramPacket dp=new DatagramPacket(str.getBytes(),str.length(),
                InetAddress.getByName("127.0.0.1"),3000);

        System.out.println("UdpSend: 我要发送信息");
        ds.send(dp);
        System.out.println("UdpSend: 我发送信息结束");

        Thread.sleep(1000);
        byte [] buf=new byte[1024];
        DatagramPacket dp2=new DatagramPacket(buf,1024);
        System.out.println("UdpSend: 我在等待信息");
        ds.receive(dp2);
        System.out.println("UdpSend: 我接收到信息");
        String str2=new String(dp2.getData(),0,dp2.getLength()) +
                " from " + dp2.getAddress().getHostAddress()+":"+dp2.getPort();
        System.out.println(str2);

        ds.close();
    }
}
UDPrecv
同样是先定义管道DatagramSocket,再定义集装箱DatagramPacket
从12行开始等待信息,接受到之后再发送一条信息出去
import java.net.*;
public class UdpRecv
{
    public static void main(String[] args) throws Exception
    {
        DatagramSocket  ds=new DatagramSocket(3000);
        byte [] buf=new byte[1024];
        DatagramPacket dp=new DatagramPacket(buf,1024);

        System.out.println("UdpRecv: 我在等待信息");
        ds.receive(dp);
        System.out.println("UdpRecv: 我接收到信息");
        String strRecv=new String(dp.getData(),0,dp.getLength()) +
        " from " + dp.getAddress().getHostAddress()+":"+dp.getPort();
        System.out.println(strRecv);

        Thread.sleep(1000);
        System.out.println("UdpRecv: 我要发送信息");
        String str="hello world 222";
        DatagramPacket dp2=new DatagramPacket(str.getBytes(),str.length(),
                InetAddress.getByName("127.0.0.1"),dp.getPort());
        ds.send(dp2);
        System.out.println("UdpRecv: 我发送信息结束");
        ds.close();
    }
}
在eclipse运行结果


在命令行运行结果

6.3 java TCP协议
①服务器:创建一个ServerSocket,等待连接
②客户机:创建一个Socket,连接到服务器
③服务器:ServerSocket接收到连接,创建一个Socket和客户的 Socket建立专线连接,后续服务器和客户机的对话(这一对Socket) 会在一个单独的线程(服务器端)上运行
④服务器的ServerSocket继续等待连接,返回①

用到的两个类
-
ServerSocket: 服务器码头,需要绑定port
如果有多块网卡,需要绑定一个IP地址
-
Socket: 运输通道
客户端需要绑定服务器的地址和Port
客户端往Socket输入流写入数据,送到服务端
客户端从Socket输出流取服务器端过来的数据,服务端反之亦然
TcpClient 客户端
作用是向服务端输出信息,并得到服务端传过来的回应
import java.net.*;
import java.io.*;

public class TcpClient {
    public static void main(String[] args) {
        try {
            Socket s = new Socket(InetAddress.getByName("127.0.0.1"), 8001); //需要服务端先开启

            //同一个通道,服务端的输出流就是客户端的输入流;服务端的输入流就是客户端的输出流
            InputStream ips = s.getInputStream();    //开启通道的输入流
            BufferedReader brNet = new BufferedReader(new InputStreamReader(ips));

            OutputStream ops = s.getOutputStream();  //开启通道的输出流
            DataOutputStream dos = new DataOutputStream(ops);

            BufferedReader brKey = new BufferedReader(new InputStreamReader(System.in));
            while (true)
            {
                String strWord = brKey.readLine();
                if (strWord.equalsIgnoreCase("quit"))
                {
                    break;
                }
                else
                {
                    System.out.println("I want to send: " + strWord);
                    dos.writeBytes(strWord + System.getProperty("line.separator"));

                    System.out.println("Server said: " + brNet.readLine());
                }
            }

            dos.close();
            brNet.close();
            brKey.close();
            s.close();
        } catch (Exception e) {
            e.printStackTrace();
        }
    }
}
TcpServer 服务端
可以接纳多个客户端,每一个客户端来了之后就会发送一个hello client
import java.net.*;
public class TcpServer2
{
    public static void main(String [] args)
    {
        try
        {
            ServerSocket ss=new ServerSocket(8001);
            while(true)
            {
                Socket s=ss.accept();
                System.out.println("来了一个client");
                new Thread(new Worker(s)).start();
            }
            //ss.close();
        }
        catch(Exception e)
        {
            e.printStackTrace();
        }
    }
}
其中worker是一个实现了runnable接口的并发类
import java.net.*;
import java.io.*;

class Worker implements Runnable {
    Socket s;

    public Worker(Socket s) {
        this.s = s;
    }

    public void run() {
        try {
            System.out.println("服务人员已经启动");
            InputStream ips = s.getInputStream();
            OutputStream ops = s.getOutputStream();

            BufferedReader br = new BufferedReader(new InputStreamReader(ips));
            DataOutputStream dos = new DataOutputStream(ops);
            while (true) {
                String strWord = br.readLine();
                System.out.println("client said:" + strWord +":" + strWord.length());
                if (strWord.equalsIgnoreCase("quit"))
                    break;
                String strEcho = strWord + " 666";
                // dos.writeBytes(strWord +"---->"+ strEcho +"\r\n");
                System.out.println("server said:" + strWord + "---->" + strEcho);
                dos.writeBytes(strWord + "---->" + strEcho + System.getProperty("line.separator"));
            }
            br.close();
            // 关闭包装类,会自动关闭包装类中所包装的底层类。所以不用调用ips.close()
            dos.close();
            s.close();
        } catch (Exception e) {
            e.printStackTrace();
        }
    }
}
命令行运行结果

6.4 HTTP
网页是特殊的网络服务(HTTP, Hypertext Transfer Protocol)
步骤一 在浏览器输入URL地址
步骤二 浏览器将连接到远程服务器上(IP+80Port)
步骤三 请求下载一个HTML文件下来,放到本地临时文件夹中
步骤四 在浏览器显示出来
Java HTTP编程 (java.net包) 支持模拟成浏览器的方式去访问网页
-
URL , Uniform Resource Locator,代表一个资源
-
URLConnection 获取资源的连接器
根据URL的openConnection()方法获得URLConnection
connect方法,建立和资源的联系通
getInputStream方法,获取资源的内容
URLConnectionGet
以get的方式访问百度,希望拿下百度首页的内容
java能拿到的都是html源代码,不能渲染成漂亮的网页
import java.io.*;
import java.net.*;
import java.util.*;

public class URLConnectionGetTest
{
   public static void main(String[] args)
   {
      try
      {
         String urlName = "http://www.baidu.com";

         URL url = new URL(urlName);
         URLConnection connection = url.openConnection();
         connection.connect();

         // 打印http的头部信息

         Map<String, List<String>> headers = connection.getHeaderFields();
         for (Map.Entry<String, List<String>> entry : headers.entrySet())
         {
            String key = entry.getKey();
            for (String value : entry.getValue())
               System.out.println(key + ": " + value);
         }

         // 输出将要收到的内容属性信息

         System.out.println("----------");
         System.out.println("getContentType: " + connection.getContentType());
         System.out.println("getContentLength: " + connection.getContentLength());
         System.out.println("getContentEncoding: " + connection.getContentEncoding());
         System.out.println("getDate: " + connection.getDate());
         System.out.println("getExpiration: " + connection.getExpiration());
         System.out.println("getLastModifed: " + connection.getLastModified());
         System.out.println("----------");

         BufferedReader br = new BufferedReader(new InputStreamReader(connection.getInputStream(), "UTF-8"));

         // 输出收到的内容
         String line = "";
         while((line=br.readLine()) != null)
         {
             System.out.println(line);
         }
         br.close();
      }
      catch (IOException e)
      {
         e.printStackTrace();
      }
   }
}
URLConnectionPost
去一个联邦快递查询右边的网站
在代码中将信息填写进网站的表单,然后post,就完成了对这个网页的提交访问
import java.io.*;
import java.net.*;
import java.nio.file.*;
import java.util.*;

public class URLConnectionPostTest
{
   public static void main(String[] args) throws IOException
   {
      String urlString = "https://tools.usps.com/go/ZipLookupAction.action";
      Object userAgent = "HTTPie/0.9.2";
      Object redirects = "1";
      CookieHandler.setDefault(new CookieManager(null, CookiePolicy.ACCEPT_ALL));

      Map<String, String> params = new HashMap<String, String>();
      params.put("tAddress", "1 Market Street");
      params.put("tCity", "San Francisco");
      params.put("sState", "CA");
      String result = doPost(new URL(urlString), params,
         userAgent == null ? null : userAgent.toString(),
         redirects == null ? -1 : Integer.parseInt(redirects.toString()));
      System.out.println(result);
   }

   public static String doPost(URL url, Map<String, String> nameValuePairs, String userAgent, int redirects)
         throws IOException
   {
      HttpURLConnection connection = (HttpURLConnection) url.openConnection();
      if (userAgent != null)
         connection.setRequestProperty("User-Agent", userAgent);

      if (redirects >= 0)
         connection.setInstanceFollowRedirects(false);

      connection.setDoOutput(true);

      //输出请求的参数
      try (PrintWriter out = new PrintWriter(connection.getOutputStream()))
      {
         boolean first = true;
         for (Map.Entry<String, String> pair : nameValuePairs.entrySet())
         {
            //参数必须这样拼接 a=1&b=2&c=3
            if (first)
            {
                first = false;
            }
            else
            {
                out.print('&');
            }
            String name = pair.getKey();
            String value = pair.getValue();
            out.print(name);
            out.print('=');
            out.print(URLEncoder.encode(value, "UTF-8"));
         }
      }
      String encoding = connection.getContentEncoding();
      if (encoding == null)
      {
          encoding = "UTF-8";
      }

      if (redirects > 0)
      {
         int responseCode = connection.getResponseCode();
         System.out.println("responseCode: " + responseCode);
         if (responseCode == HttpURLConnection.HTTP_MOVED_PERM
               || responseCode == HttpURLConnection.HTTP_MOVED_TEMP
               || responseCode == HttpURLConnection.HTTP_SEE_OTHER)
         {
            String location = connection.getHeaderField("Location");
            if (location != null)
            {
               URL base = connection.getURL();
               connection.disconnect();
               return doPost(new URL(base, location), nameValuePairs, userAgent, redirects - 1);
            }

         }
      }
      else if (redirects == 0)
      {
         throw new IOException("Too many redirects");
      }

      //接下来获取html 内容
      StringBuilder response = new StringBuilder();
      try (Scanner in = new Scanner(connection.getInputStream(), encoding))
      {
         while (in.hasNextLine())
         {
            response.append(in.nextLine());
            response.append("\n");
         }
      }
      catch (IOException e)
      {
         InputStream err = connection.getErrorStream();
         if (err == null) throw e;
         try (Scanner in = new Scanner(err))
         {
            response.append(in.nextLine());
            response.append("\n");
         }
      }

      return response.toString();
   }
}
6.5 HttpClient
两个包
java.net.http包,jdk自带的

JDKHttpClientGet
public class JDKHttpClientGetTest {

    public static void main(String[] args) throws IOException, InterruptedException {
        doGet();
    }

    public static void doGet() {
        try{
            HttpClient client = HttpClient.newHttpClient();
            HttpRequest request = HttpRequest.newBuilder(URI.create("http://www.baidu.com")).build();
            HttpResponse response = client.send(request, HttpResponse.BodyHandlers.ofString());
            System.out.println(response.body());
        }
        catch(Exception e) {
            e.printStackTrace();
        }
    }
}
JDKHttpClientPost
public class JDKHttpClientPostTest {

    public static void main(String[] args) throws IOException, InterruptedException {
        doPost();
    }

    public static void doPost() {
        try {
            HttpClient client = HttpClient.newBuilder().build();
            HttpRequest request = HttpRequest.newBuilder()
                    .uri(URI.create("https://tools.usps.com/go/ZipLookupAction.action"))
                    //.header("Content-Type","application/x-www-form-urlencoded")
                    .header("User-Agent", "HTTPie/0.9.2")
                    .header("Content-Type","application/x-www-form-urlencoded;charset=utf-8")
                    //.method("POST", HttpRequest.BodyPublishers.ofString("tAddress=1 Market Street&tCity=San Francisco&sState=CA"))
                    //.version(Version.HTTP_1_1)
                    .POST(HttpRequest.BodyPublishers.ofString("tAddress="
                        + URLEncoder.encode("1 Market Street", "UTF-8")
                        + "&tCity=" + URLEncoder.encode("San Francisco", "UTF-8") + "&sState=CA"))
                    //.POST(HttpRequest.BodyPublishers.ofString("tAddress=" + URLEncoder.encode("1 Market Street", "UTF-8") + "&tCity=" + URLEncoder.encode("San Francisco", "UTF-8") + "&sState=CA"))
                    .build();
            HttpResponse response = client.send(request, HttpResponse.BodyHandlers.ofString());
            System.out.println(response.statusCode());
            System.out.println(response.headers());
            System.out.println(response.body().toString());

        }
        catch(Exception e) {
            e.printStackTrace();
        }
    }
}
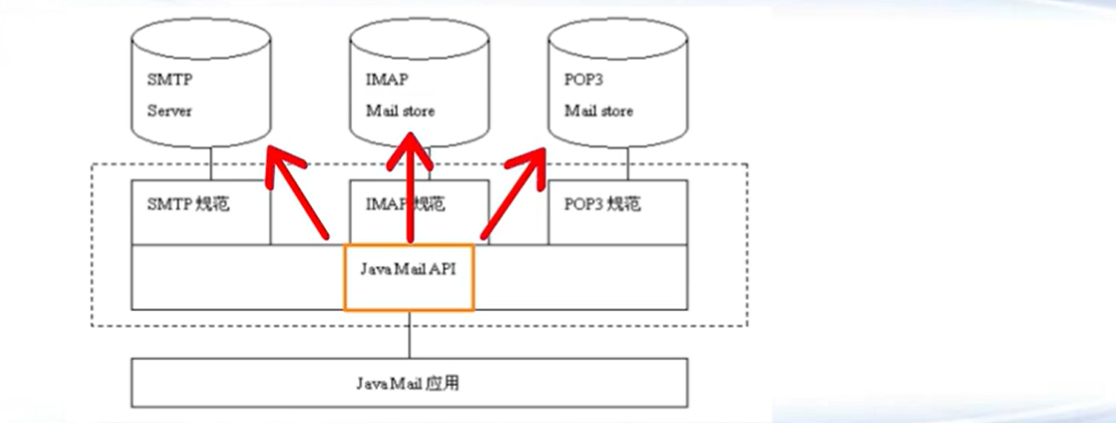
6.9 邮件
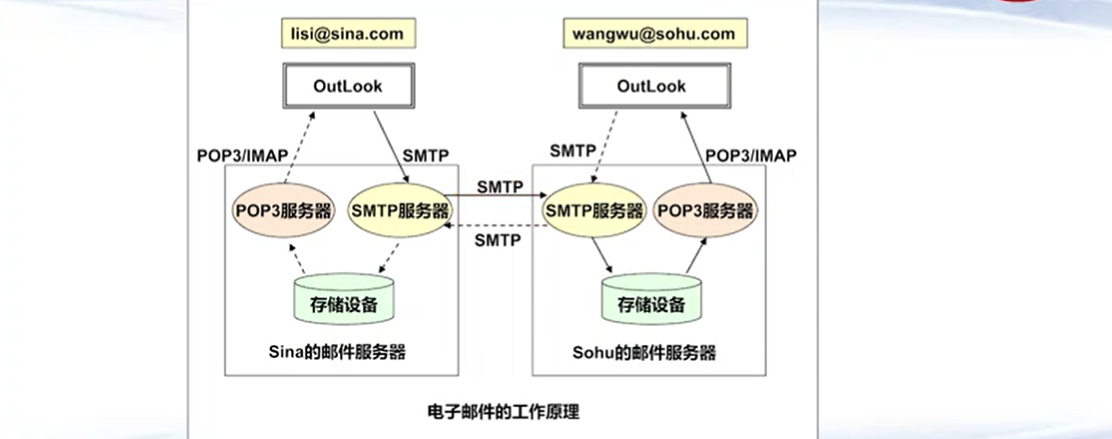
邮件客户端:Foxmail、OutLook(Express, Microsoft Outlook)、Thunderbird (linux平台)
邮件服务端:Microsoft Exchange Server、IBM Lotus Notes、SendMail, Qmail, James
主要协议(发送端口25, 接收端口110)
发送, SMTP, Simple Mail Transfer Protocol
接收, Pop3, Post Office Protocol 3, (POP)
接收, IMAP, Internet Message Access Protocol, IMAP4
在正式开发之前,需要去邮箱里面确认

添加依赖
<dependencies>
    <!-- https://mvnrepository.com/artifact/javax.mail/javax.mail-api -->
    <dependency>
        <groupId>com.sun.mail</groupId>
        <artifactId>javax.mail</artifactId>
        <version>1.6.2</version>
    </dependency>
</dependencies>
MailClientRecv
package tools;

import javax.mail.*;
import javax.mail.internet.*;
import javax.activation.*;
import java.util.*;

public class MailClientRecv {
  private Session session;
  private Store store;
  private String username = "13896796126@163.com";
  private String password = " ";
  private String popServer = "pop.163.com";

  public void init()throws Exception
  {
    //设置属性
    Properties  props = new Properties();
    props.put("mail.store.protocol", "pop3");
    props.put("mail.imap.class", "com.sun.mail.imap.IMAPStore");
    props.put("mail.pop3.class", "com.sun.mail.pop3.POP3Store");

    // 创建Session对象
    session = Session.getInstance(props,null);
    session.setDebug(false); //输出跟踪日志

    // 创建Store对象
    store = session.getStore("pop3");

    //连接到收邮件服务器
    store.connect(popServer,username,password);
  }

  public void receiveMessage()throws Exception
  {
    String folderName = "inbox";
    Folder folder=store.getFolder(folderName);
    if(folder==null)
    {
        throw new Exception(folderName+"邮件夹不存在");
    }
    //打开信箱
    folder.open(Folder.READ_ONLY);
    System.out.println("您的收件箱有"+folder.getMessageCount()+"封邮件.");
    System.out.println("您的收件箱有"+folder.getUnreadMessageCount()+"封未读的邮件.");

    //读邮件
    Message[] messages=folder.getMessages();
    //for(int i=1;i<=messages.length;i++)
    for(int i=1;i<=3;i++)
    {
      System.out.println("------第"+i+"封邮件-------");
      //打印邮件信息
      Message message = messages[i];
      //folder.getMessage(i).writeTo(System.out);
      System.out.println((message.getFrom())[0]);
      System.out.println(message.getSubject());
      System.out.println();
    }
    folder.close(false);  //关闭邮件夹
  }

  public void close()throws Exception
  {
    store.close();
  }

  public static void main(String[] args)throws Exception {
    MailClientRecv client=new MailClientRecv();
    //初始化
    client.init();
    //接收邮件
    client.receiveMessage();
    //关闭连接
    client.close();
  }
}
运行结果

MailClientSend
package tools;

import javax.mail.*;
import java.util.*;
import messages.*;

public class MailClientSend {
  private Session session;
  private Transport transport;
  private String username = "zhangcaiyii@163.com";
  private String password = "ZCY929weilaikeqi";
  private String smtpServer = "smtp.163.com";

  public void init()throws Exception
  {
    //设置属性
    Properties  props = new Properties();
    props.put("mail.transport.protocol", "smtp");
    props.put("mail.smtp.class", "com.sun.mail.smtp.SMTPTransport");
    props.put("mail.smtp.host", smtpServer); //设置发送邮件服务器
    props.put("mail.smtp.port", "25");
    props.put("mail.smtp.auth", "true"); //SMTP服务器需要身份验证

    // 创建Session对象
    session = Session.getInstance(props,new Authenticator(){   //验账账户
        public PasswordAuthentication getPasswordAuthentication() {
          return new PasswordAuthentication(username, password);
        }
 });
    session.setDebug(true); //输出跟踪日志

    // 创建Transport对象
    transport = session.getTransport();
  }

  public void sendMessage()throws Exception{
    //创建一个邮件
    //Message msg = TextMessage.generate();  //另写一个类,见下面
    //Message msg = HtmlMessage.generate();
    Message msg = AttachmentMessage.generate();
    //发送邮件
    transport.connect();
    transport.sendMessage(msg, msg.getAllRecipients());
    //打印结果
    System.out.println("邮件已经成功发送");
  }

  public void close()throws Exception
  {
    transport.close();
  }

  public static void main(String[] args)throws Exception {

    MailClientSend client=new MailClientSend();
    //初始化
    client.init();
    //发送邮件
    client.sendMessage();
    //关闭连接
    client.close();
  }
}
发送文本右键 TextMessage
public class TextMessage {
    public static MimeMessage generate() throws Exception {
        String from = "lychen@sei.ecnu.edu.cn "; // 发件人地址
        String to = "chenliangyu1980@126.com"; // 收件人地址

        String subject = "test";
        String body = "您好,这是来自一封chenliangyu的测试邮件";

        // 创建Session实例对象
        Session session = Session.getDefaultInstance(new Properties());
        // 创建MimeMessage实例对象
        MimeMessage message = new MimeMessage(session);
        // 设置发件人
        message.setFrom(new InternetAddress(from));
        // 设置收件人
        message.setRecipients(Message.RecipientType.TO, InternetAddress.parse(to));
        // 设置发送日期
        message.setSentDate(new Date());
        // 设置邮件主题
        message.setSubject(subject);
        // 设置纯文本内容的邮件正文
        message.setText(body);
        // 保存并生成最终的邮件内容
        message.saveChanges();

        // 把MimeMessage对象中的内容写入到文件中
        //msg.writeTo(new FileOutputStream("e:/test.eml"));
        return message;
    }
}
发送html邮件 HTMLMessage
public class HtmlMessage {
    public static MimeMessage generate() throws Exception
    {
        String from = "lychen@sei.ecnu.edu.cn "; // 发件人地址
        String to = "chenliangyu1980@126.com"; // 收件人地址

        String subject = "HTML邮件";
        String body = "<a href=http://www.ecnu.edu.cn>"
          + "<h4>欢迎大家访问我们的网站</h4></a></br>"
          + "<img src=\"https://news.ecnu.edu.cn/_upload/article/images/2e/e2/6b554d034c9192101208c732195e/16a6ec66-6729-4469-a5f4-0435e0f2e66a.jpg\">";

        // 创建Session实例对象
        Session session = Session.getDefaultInstance(new Properties());
        // 创建MimeMessage实例对象
        MimeMessage message = new MimeMessage(session);
        // 设置发件人
        message.setFrom(new InternetAddress(from));
        // 设置收件人
        message.setRecipients(Message.RecipientType.TO, InternetAddress.parse(to));
        // 设置发送日期
        message.setSentDate(new Date());
        // 设置邮件主题
        message.setSubject(subject);
        // 设置HTML格式的邮件正文
        message.setContent(body, "text/html;charset=gb2312");
        // 保存并生成最终的邮件内容
        message.saveChanges();

        // 把MimeMessage对象中的内容写入到文件中
        //msg.writeTo(new FileOutputStream("e:/HtmlMessage.eml"));
        return message;
    }
}
第七章 数据库编程
7.2 JDBC基本操作
java和数据库是两套平行的系统,要想连接需要借助jdbc(主流)
jdbc sql连接操作

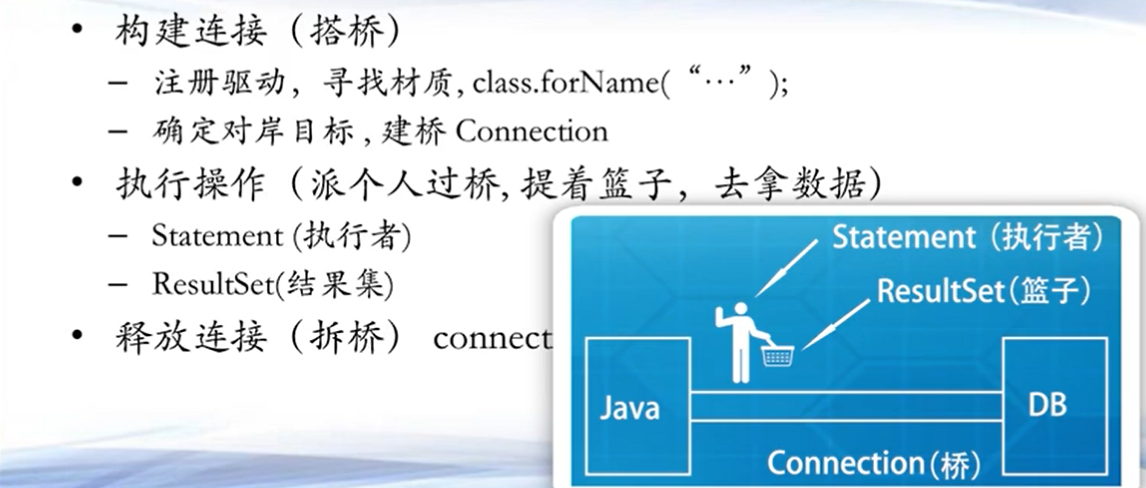
Select
首先添加mysql依赖
<dependencies>
    <dependency>
        <groupId>mysql</groupId>
        <artifactId>mysql-connector-java</artifactId>
        <version>8.0.25</version>
    </dependency>
</dependencies>
注意一个大坑,配置文件里mysql-connector-jar和本地mysql的版本一定要一致!否则会报错

该代码可以直接用
要改的地方只有数据库名,用户名密码,select语句,还有输出是get的数据类型
import java.sql.*;

public class SelectTest {
    public static void main(String[] args){

        //构建Java和数据库之间的桥梁介质
        try{
            Class.forName("com.mysql.jdbc.Driver");
            System.out.println("注册驱动成功!");
        }catch(ClassNotFoundException e1){
            System.out.println("注册驱动失败!");
            e1.printStackTrace();
            return;
        }

        String url="jdbc:mysql://localhost:3306/blog?useSSL=false";
        Connection conn = null;
        try {
            //构建Java和数据库之间的桥梁:URL,用户名,密码
            conn = DriverManager.getConnection(url, "root", " ");

            //构建数据库执行者
            Statement stmt = conn.createStatement();
            System.out.println("创建Statement成功!");

            //执行SQL语句并返回结果到ResultSet
            ResultSet rs = stmt.executeQuery("select id, name, age from t_person order by id");

            //开始遍历ResultSet数据
            while(rs.next())
            {
                System.out.println(rs.getInt(1) + "," + rs.getString(2) + "," + rs.getInt("age"));
            }

            rs.close();
            stmt.close();

        } catch (SQLException e){
            e.printStackTrace();
        }
        finally
        {
            try
            {
                if(null != conn)
                {
                    conn.close();
                }
            }
            catch (SQLException e){
                e.printStackTrace();
            }
        }
    }
}
打开navicat,连接到服务器,并创建表 t_person

运行结果
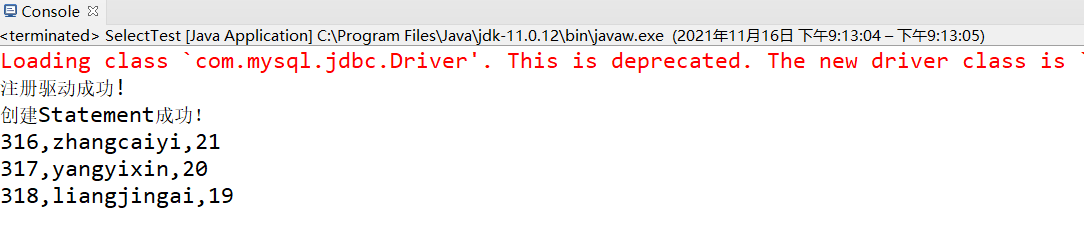
Update
该代码跟select唯一不同的就是,执行语句一个是stmt.executeQuery(sql),一个是stmt.executeUpdate(sql)
也可以直接用,用的时候改改几个sql语句,数据库名字,用户名密码就好
import java.sql.*;

public class UpdateTest {
    public static void main(String[] args){
        executeUpdate("update t_person set age = 40 where id = 316");
        executeUpdate("insert into t_person(id, name, age) values(320, 'xuexiaonan', 22)");
        executeUpdate("delete from t_person where id = 318");
    }
    public static void executeUpdate(String sql)
    {
        //构建Java和数据库之间的桥梁介质
        try{
            Class.forName("com.mysql.cj.jdbc.Driver");
            System.out.println("注册驱动成功!");
        }catch(ClassNotFoundException e1){
            System.out.println("注册驱动失败!");
            e1.printStackTrace();
        }

        String url="jdbc:mysql://localhost:3306/blog?useSSL=false";
        Connection conn = null;
        try {
            //构建Java和数据库之间的桥梁:URL,用户名,密码
            conn = DriverManager.getConnection(url, "root", "zcy123456");

            //构建数据库执行者
            Statement stmt = conn.createStatement();
            System.out.println("创建Statement成功!");

            //执行SQL语句
            int result = stmt.executeUpdate(sql);

            stmt.close();

        } catch (SQLException e){
            e.printStackTrace();
        }
        finally
        {
            try
            {
                if(null != conn)
                {
                    conn.close();
                }
            }
            catch (SQLException e){
                e.printStackTrace();
            }
        }
    }
}
运行结果

7.3 JDBC高级特性
addbsh
preparedStatement 使用问号来代替字符串拼接
7.4 数据库连接池
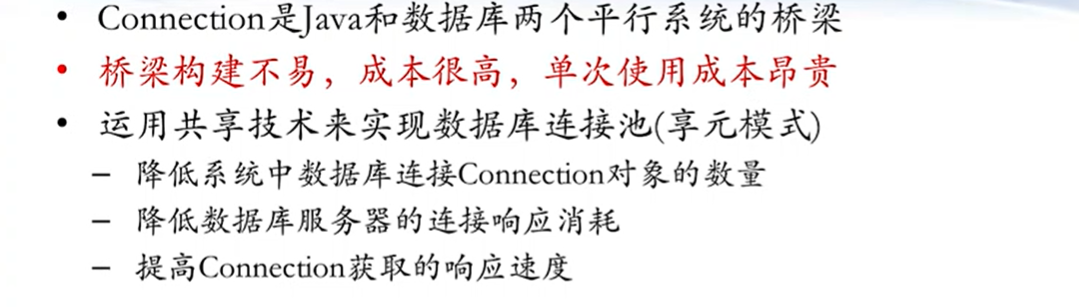

数据库连接池
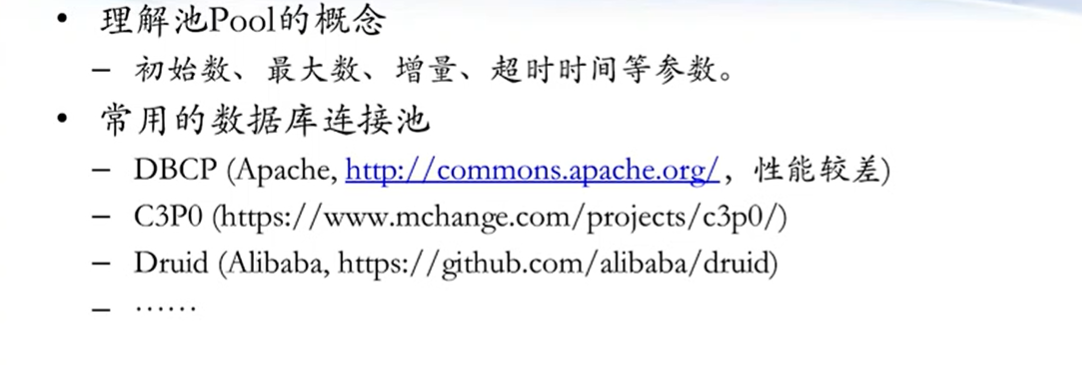
主程序
import java.sql.*;

public class SelectTest {
    public static void main(String[] args){

        Connection conn = null;
        try {
            //从c3p0获取
            //conn = C3p0Factory1.getConnection();
            //conn = C3p0Factory2.getConnection();

            //从Druid获取
            //conn = DruidFactory1.getConnection();
            conn = DruidFactory2.getConnection();

            //构建数据库执行者
            Statement stmt = conn.createStatement();
            System.out.println("创建Statement成功!");

            //执行SQL语句并返回结果到ResultSet
            ResultSet rs = stmt.executeQuery("select id, name, age from t_person order by id");

            //开始遍历ResultSet数据
            while(rs.next())
            {
                System.out.println(rs.getInt(1) + "," + rs.getString(2) + "," + rs.getInt("age"));
            }

            rs.close();
            stmt.close();

        } catch (Exception e){
            e.printStackTrace();
        } finally {
            try {
                if(null != conn) {
                    conn.close();
                }
            } catch (SQLException e){
                e.printStackTrace();
            }
        }
    }
}
c3p0
引入依赖
<dependency>
    <groupId>com.mchange</groupId>
    <artifactId>c3p0</artifactId>
    <version>0.9.5.2</version>
</dependency>
c3p0是管理数据库连接的,它不能代替数据库连接